USM Boarding
v1.1.913
USM Boarding controls the content shown on stadium perimeter LED boards. It stores the media, the layouts and the running order for an event, and drives a bundled render engine that produces the video signal sent to the LED processor. This manual describes how the program is structured, what each page does, and how to configure and operate it.
How the manual is organised
Setup
Projects, screens, panel geometry, zones and brightness.
Content
Media, sequences, templates and playlists.
Playout
Transport controls, Single Mode, Multi Mode and cues.
Live content
Sources, stingers, LiveText, scoreboard and line-ups.
Components and signal path
A perimeter board is a continuous strip of LED panels installed around the pitch. USM treats that strip as a single canvas. Four components sit between an operator action and the picture on the boards.
USM Boarding
Stores projects, screens, media, playlists and cues. Holds playout state, decides timing, and prepares content in advance.
CasparCG
Runs as a separate process on the same PC. Plays the file it is told to play, on the layer it is told to use. Bundled with USM.
LED processor
Receives one wide video signal and distributes it to the panel rows and cabinets around the pitch.
Perimeter boards
The physical LED panels.
Why the two processes are separate
USM communicates with CasparCG over a text protocol on the same machine. Because rendering runs in a separate process, USM can load content into hidden layers before it is needed. This is the basis of preheating, the two-bank transition system and seamless playlist switching.
Load-then-reveal
Instructing a render engine to play a file directly on a visible layer tears down the current content first, producing a black frame. USM instead loads content on a hidden layer and then reveals it. The same two-step pattern is used for playlist advances, cues, stingers and line-up reveals.
Requirements
| Item | Description | Notes |
|---|---|---|
| Playout PC | Windows machine running USM Boarding and CasparCG | One video output per LED screen, plus a monitor for the operator |
| Licence | Activated licence bound to that machine | Playout is disabled without a valid licence. Screen count and optional modules are set per licence |
| Project | Screens, media, sequences, playlists and cues for the event | All data is scoped to a project |
| Media | Stills and video at the wall's pixel dimensions | USM reads each file's resolution and derives its default width on the wall |
Starting the application
USM Boarding installs as a standard Windows application and includes its own copy of CasparCG, so no separate render engine installation is required. On launch the application opens on the Dashboard.
Licensing
Playout requires a valid licence. Without one the application still opens and content can be built, but the transport controls remain disabled. The licence is bound to the machine and determines:
- the number of screens that may be configured — screens beyond the licensed count are refused;
- which optional modules are available — Stingers, LiveText, Live Sources, Animations, Starting XI and EQ Comp are enabled per licence key.
Where a module is not licensed, its page and its related toggles are hidden rather than shown in a disabled state. Unlicensed builds apply a watermark to the output.
Status indicators
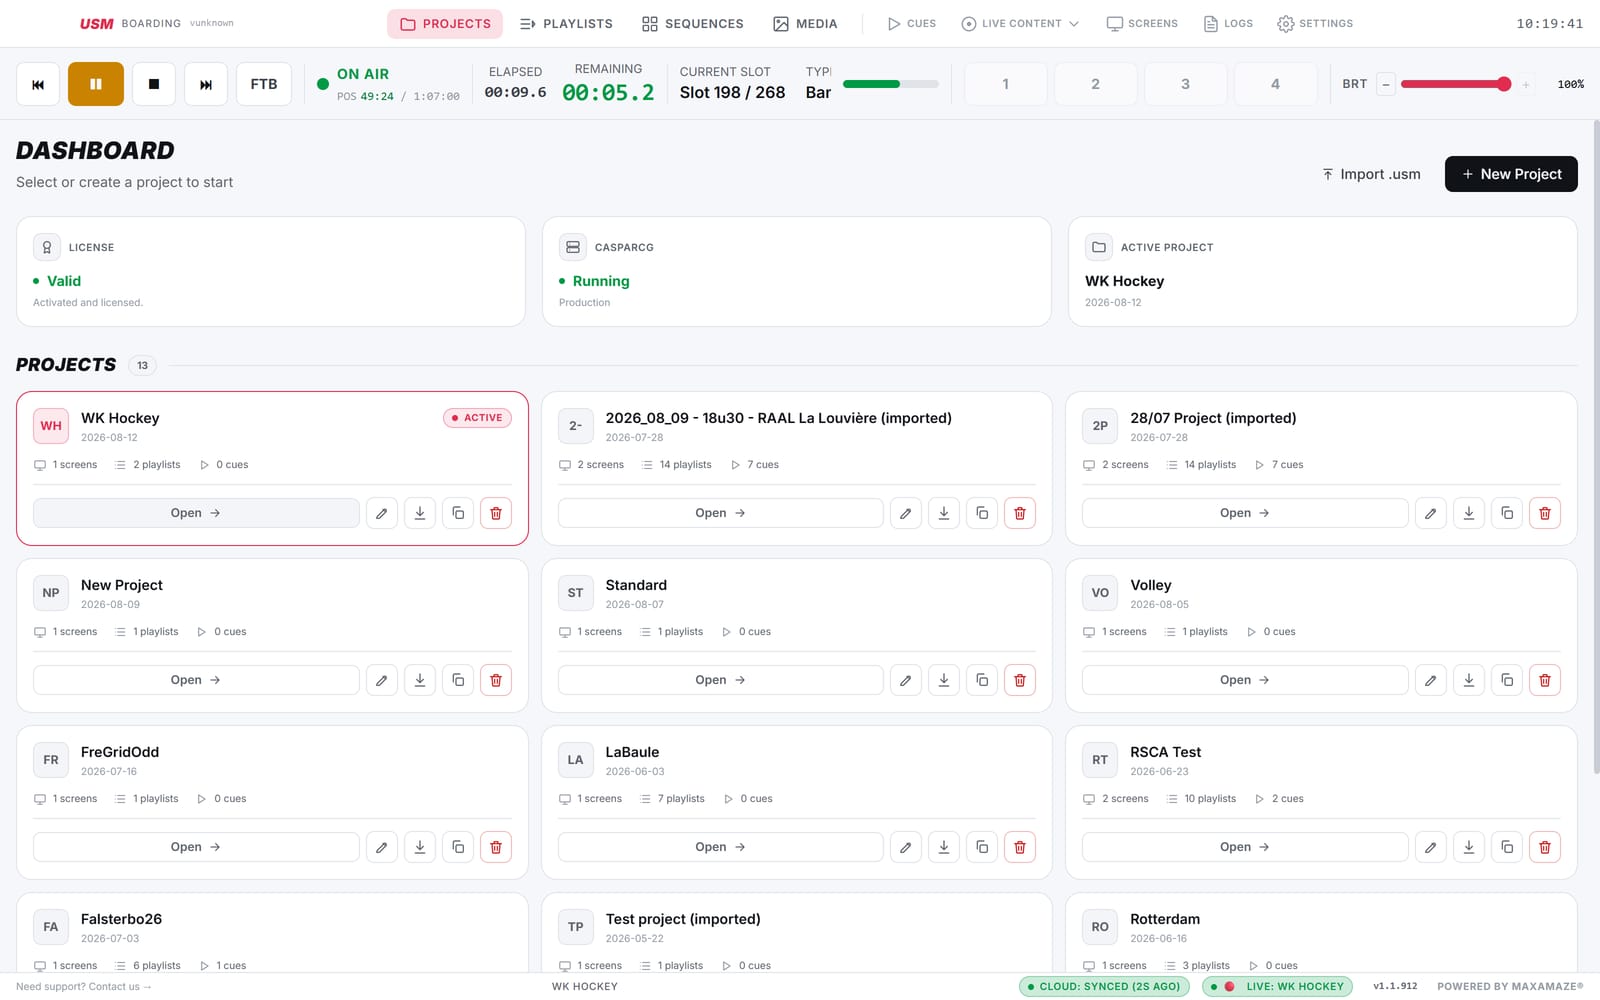
The Dashboard shows three status cards: Licence (valid or not), CasparCG (running or stopped) and Active project. The status bar at the foot of every page repeats the CasparCG state and shows the age of the last cloud sync.
Projects
A project contains the screens, media, sequences, playlists, cues, stingers, line-ups and settings for one event. All data is scoped to a project; the application remains on the Dashboard until a project is opened.
One active project
Exactly one project is active at a time. Opening another while a playlist is live requires confirmation; the live output continues while editing moves to the new project.
Export and import
A project exports to a single .usm file containing its database rows and its media. Export and import are streamed, so large projects transfer without loading fully into memory.
Duplicate
Duplicating copies the whole structure — screens, sequences, playlists, role flags, stingers and line-ups.
Switching while a playlist is live
Opening another project while playout is running is permitted but requires confirmation. USM states that the live output continues and that only the project being edited changes. The rendering engine stays on the previous project's screens until it is explicitly started on the new project's screens.
Imported projects and CasparCG channels
An imported project includes the screens it was built for, but those screens arrive without a CasparCG channel assigned. Open the Screens page and start them before first use. If another project is currently rendering, USM prompts to stop it and switch the engine to this project's screens.
Screens
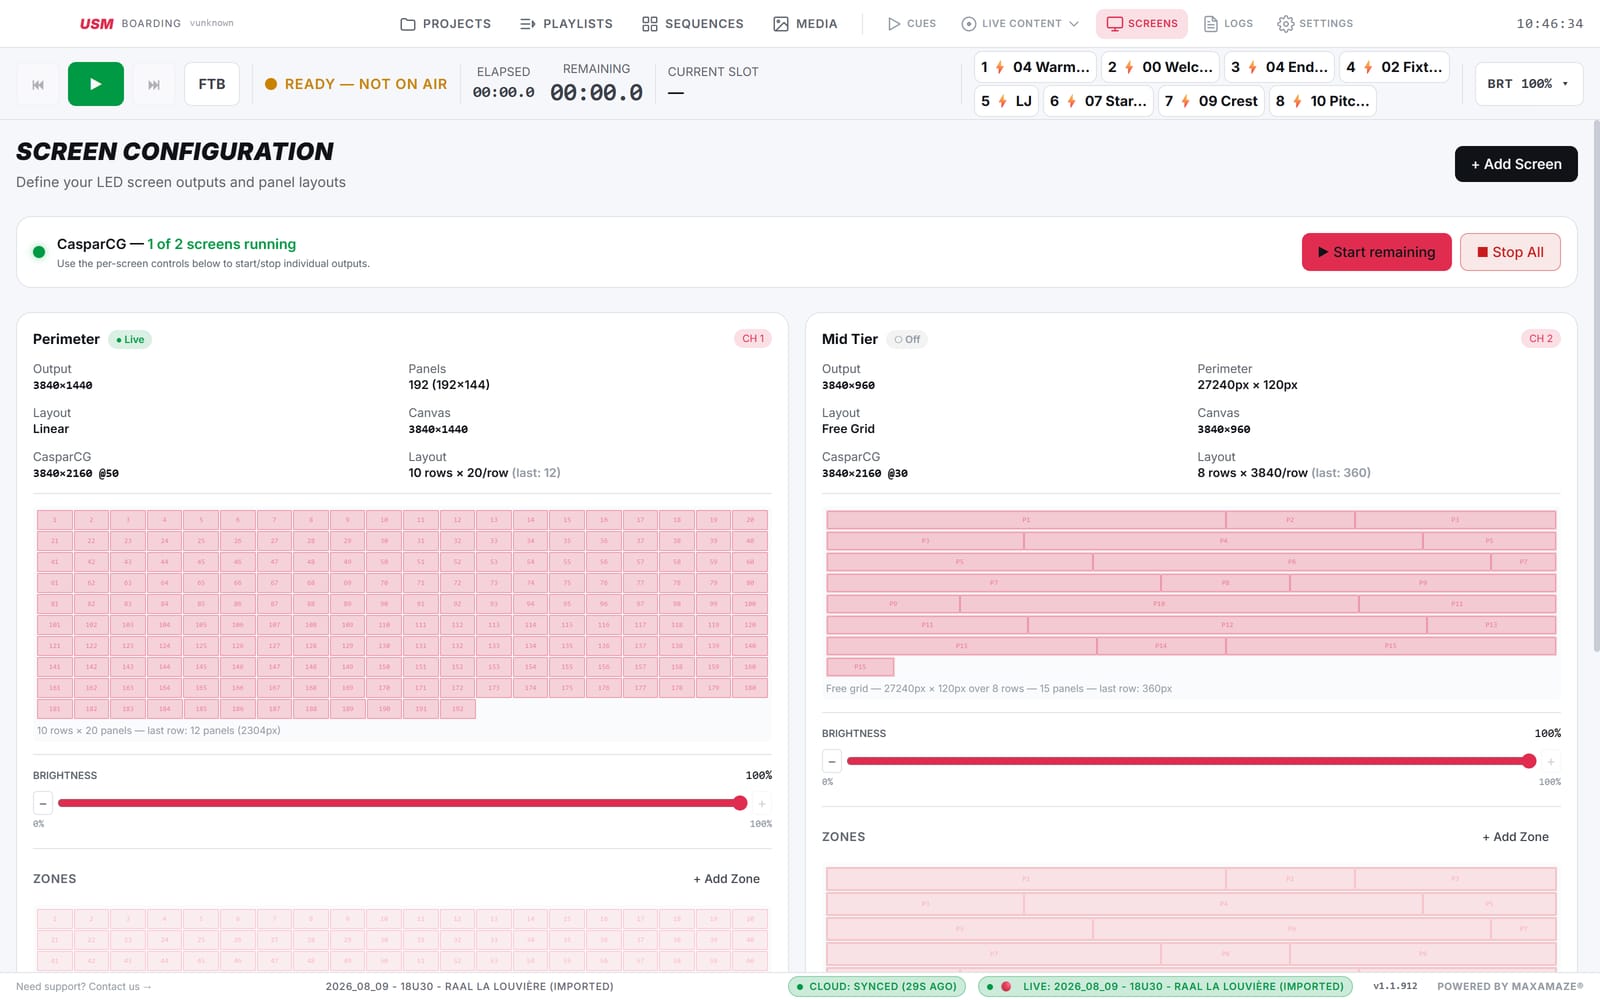
A screen represents one continuous LED surface driven by one CasparCG channel and one video output. A venue with a perimeter ring and a separate mid-tier strip is configured as two screens.
| Setting | Function |
|---|---|
| Output resolution | The canvas CasparCG renders, for example 3840×2160. This is the signal sent to the LED processor. |
| Frame rate | 25, 50 or 60 Hz, matched to the LED processor. USM can detect the output display's refresh rate and match it. |
| Canvas | The area of that output the wall occupies, for example 3840×1440 within a 2160-line signal. |
| Panel layout | How the strip is divided into rows on the canvas, for example 10 rows of 20 panels with 12 in the last row. |
| Display and presentation | Which physical output carries the wall, fullscreen or windowed, and the frame presentation method. |
Row folding
A perimeter is a single long strip — 27 240 pixels in the example on the next page. No video output is that wide, so USM divides the strip into stacked rows on the canvas, and the LED processor reassembles it around the pitch. A banner wider than one row therefore continues on the row below; on the wall that is the next section of the same strip. USM refers to this as folding.
Starting and stopping
Start All Screens boots the engine with every configured screen. Per-screen Start and Stop controls are available for rigs where one wall is worked on while another remains live. Adding a CasparCG channel requires a fresh engine boot: if a newly added screen does not start on its own, stop all screens and start them again.
Effect of Stop All
Stop All takes every output dark until restarted. The walls then show the configured boot default, normally black or the test pattern. USM requires confirmation before proceeding.
Screen setup options
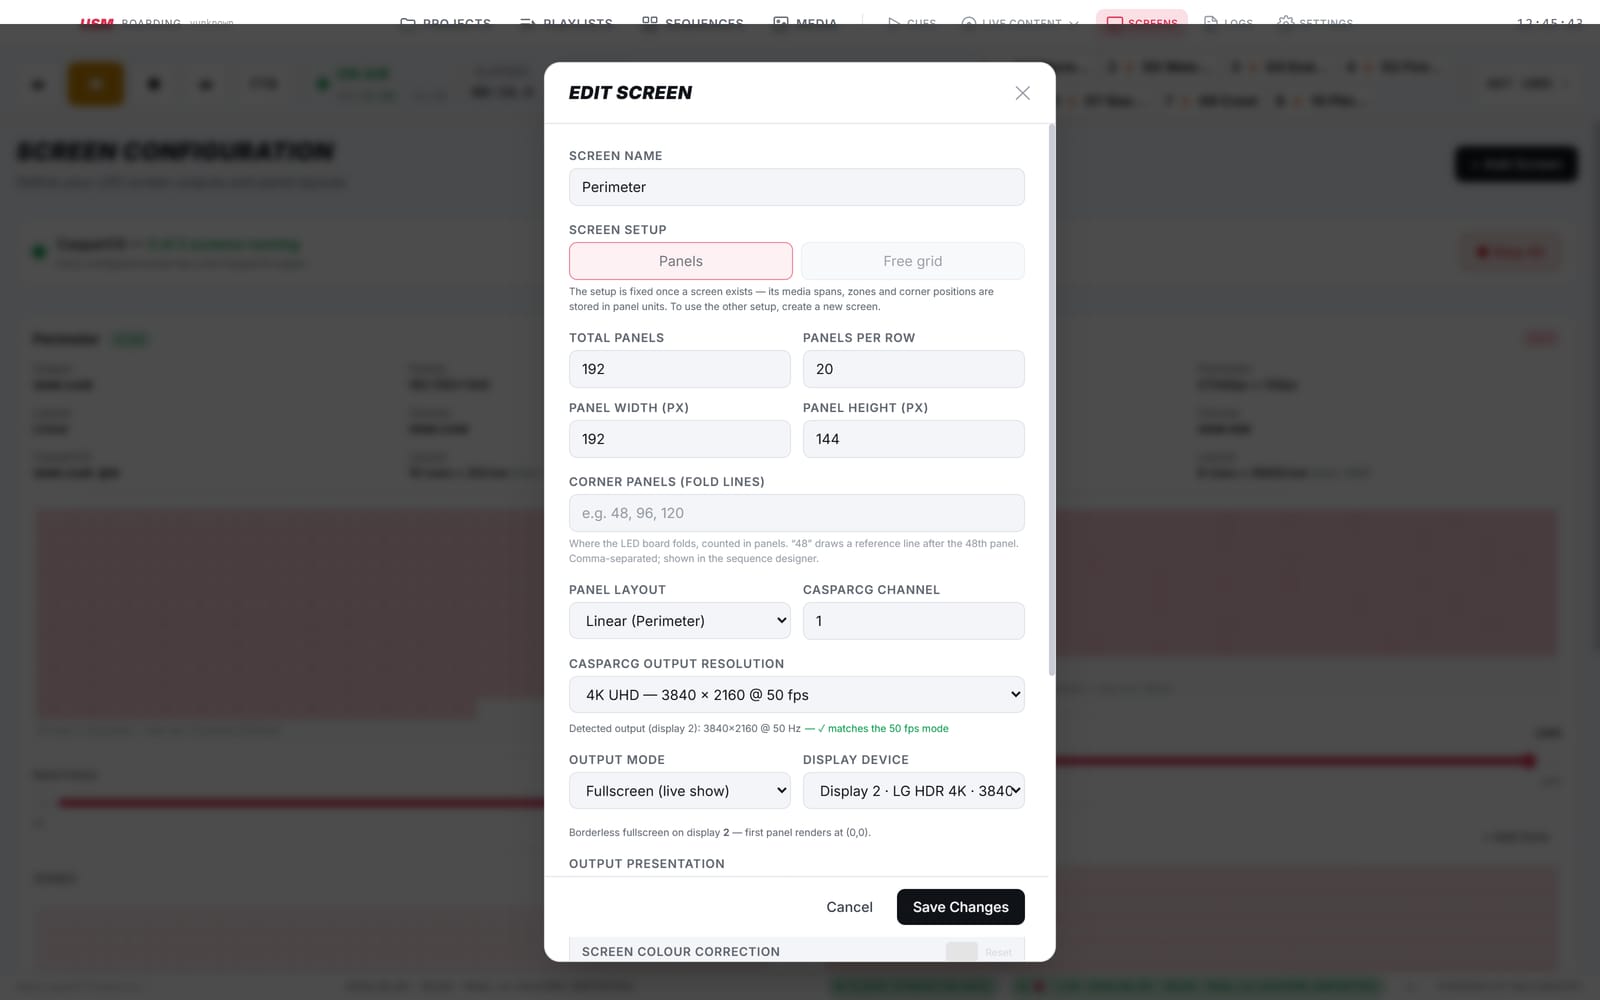
All screen properties are set in the Edit Screen dialog, opened from the Edit button on a screen card. The fields fall into three groups: panel geometry, CasparCG output, and colour.
Panel geometry
| Field | Function |
|---|---|
| Screen setup | Panels or Free grid. Fixed once the screen exists, because media spans, zones and corner positions are stored in panel units. To use the other mode, create a new screen. |
| Total panels | The number of panels around the whole wall. |
| Panels per row | How many panels are placed on each row of the video canvas before folding to the next row. |
| Panel width / height (px) | The pixel dimensions of one panel, for example 192 × 144. |
| Corner panels (fold lines) | Where the physical board turns a corner, counted in panels. Entering 48 draws a reference line after the 48th panel. Comma-separated, and displayed in the Sequence Designer so artwork can be kept clear of corners. |
| Panel layout | Linear (Perimeter) for a continuous strip, or Grid (Big Screen) for a rectangular screen. |
The dialog shows the resulting layout as you type — panels per row × rows, the size of a partial last row, and the total LED region in pixels, with a scale diagram of the fold.
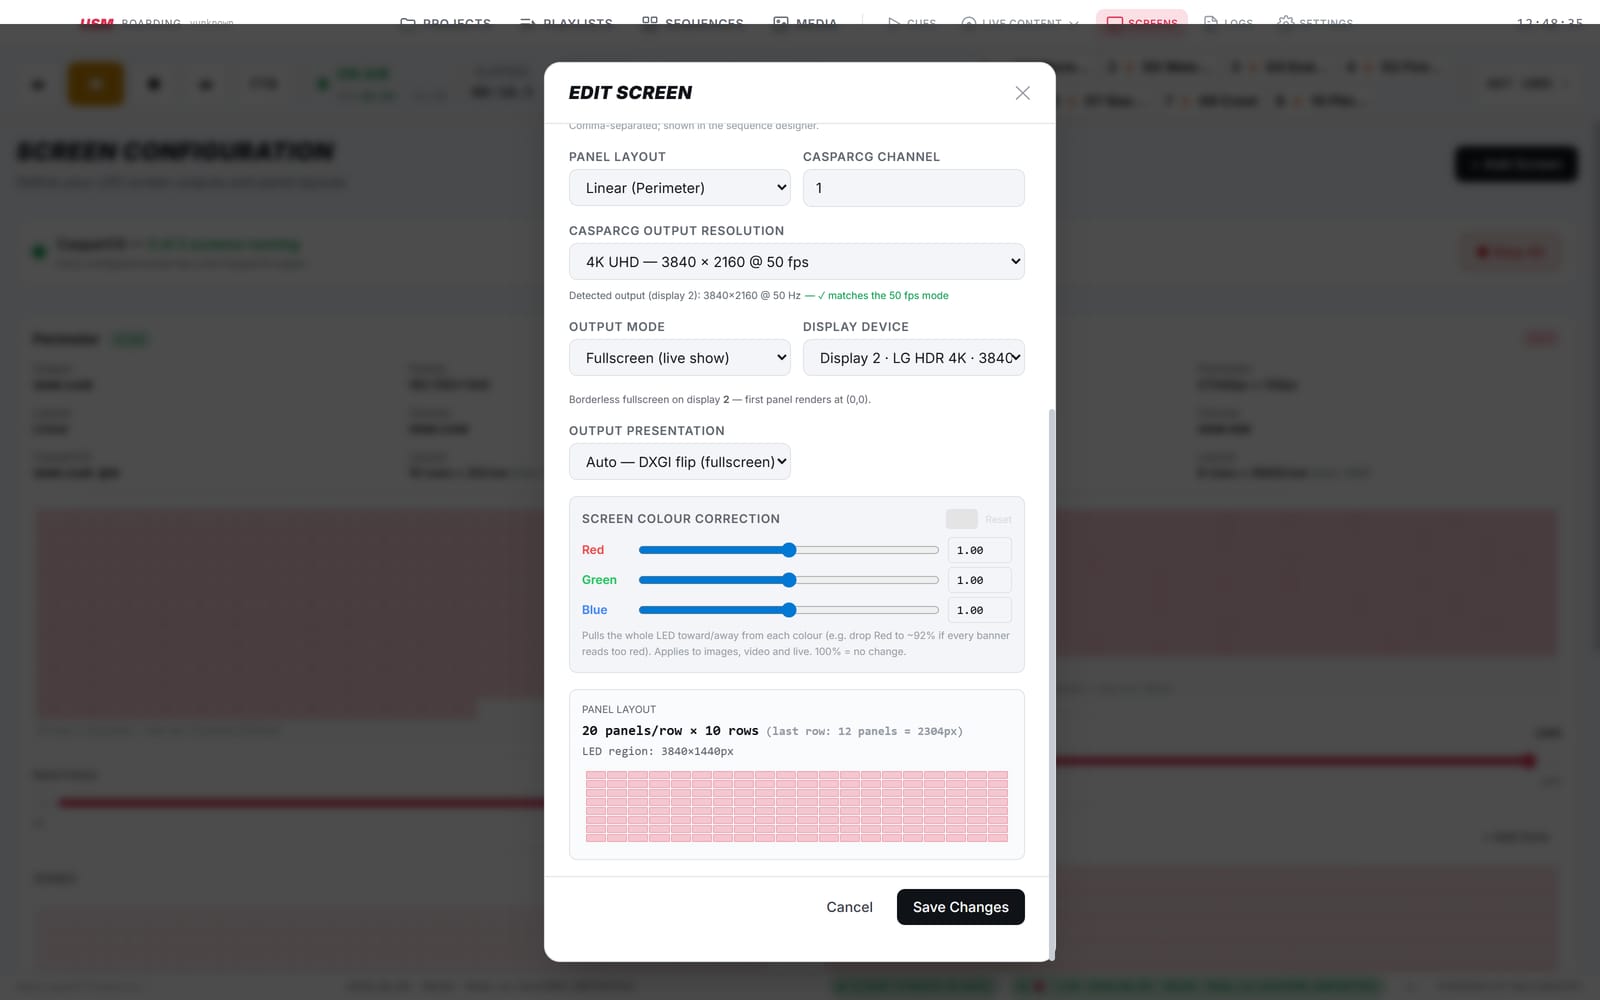
CasparCG output
| Field | Options |
|---|---|
| CasparCG channel | The engine channel this screen renders on. Each screen needs its own channel. |
| Output resolution | 4K UHD 3840×2160 or Full HD 1920×1080, each at 25, 30, 50 or 60 fps. USM reports the detected refresh rate of the selected display and confirms whether it matches the chosen mode. |
| Output mode | Fullscreen (live show) or Windowed (testing). |
| Display device | Which physical display carries the output. Detected displays are listed with resolution and refresh rate. |
| Output presentation | Auto, DXGI flip or OpenGL window (classic) — see the next page. |
Screen colour correction
Red, green and blue multipliers applied to the entire screen, where 100 % means no change. Used to correct a wall that reads warm or cold overall — for example reducing red to about 92 % if every banner appears too red. It applies to stills, video and live sources alike.
Setting up a Free grid screen
A Free grid screen is described in pixels rather than panel counts, so the Edit Screen dialog presents a different set of fields. Everything below the geometry — CasparCG channel, resolution, output mode, display device, presentation and colour — is identical to a Panels screen.
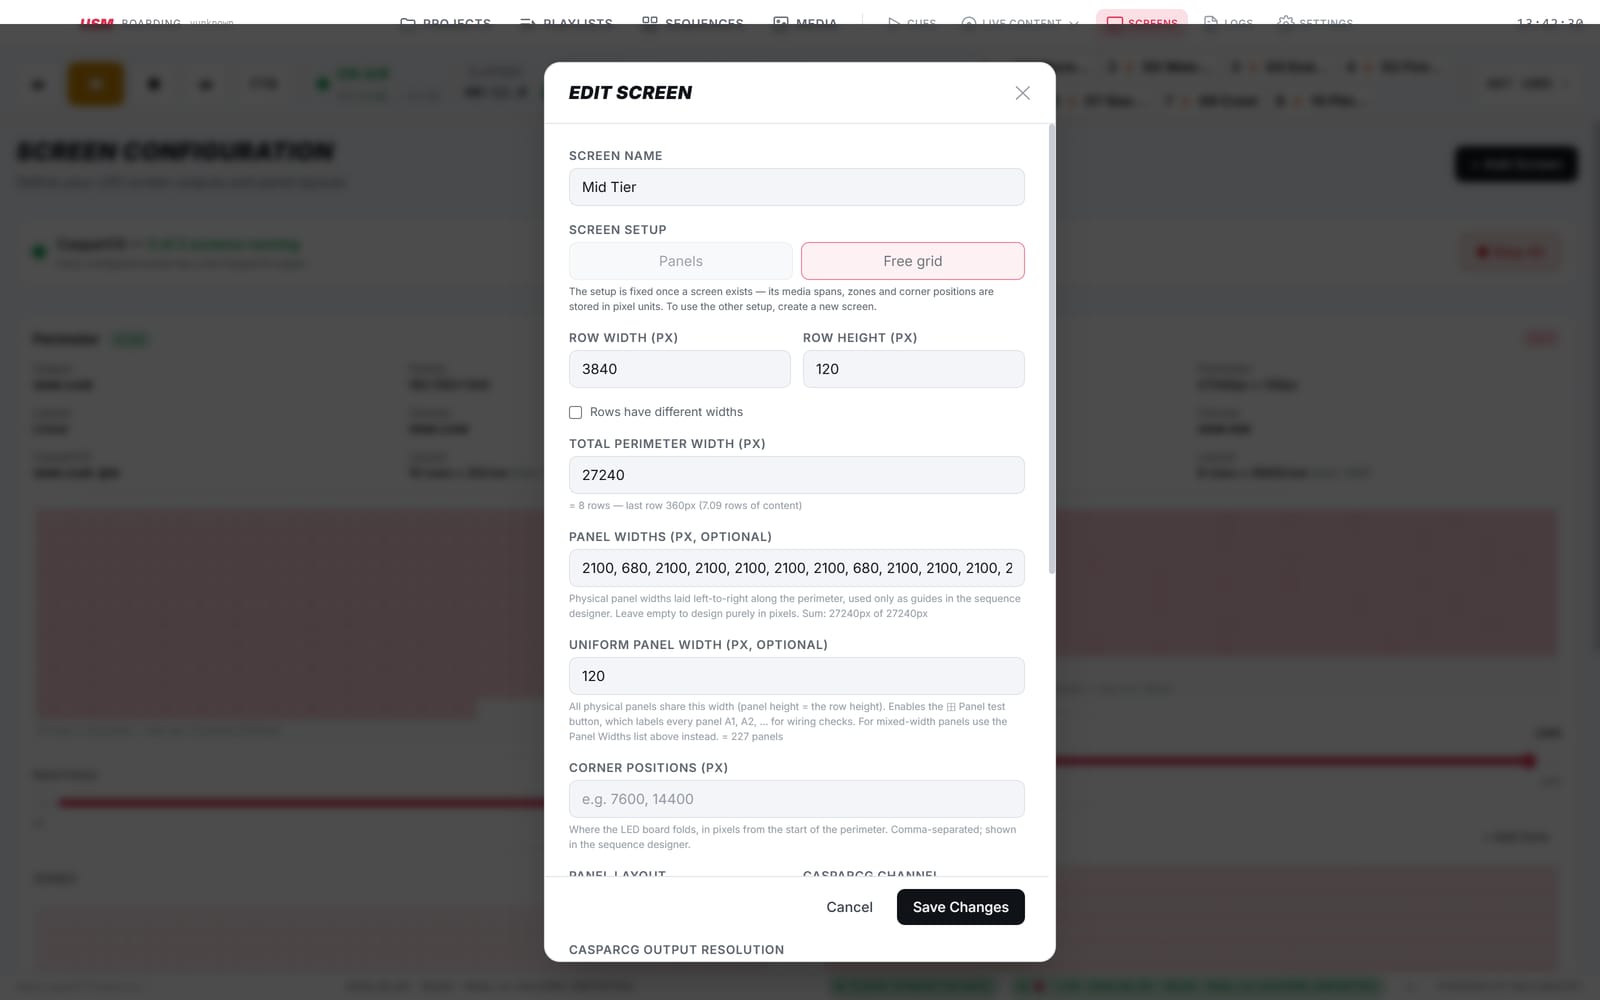
| Field | Function |
|---|---|
| Row width (px) | How much of the perimeter is laid on one row of the video canvas — normally the output width, for example 3840. |
| Row height (px) | The height of the strip, for example 120. |
| Rows have different widths | Enable where the rows are not all the same length, and enter each row's width individually. |
| Total perimeter width (px) | The full length of the strip, for example 27 240. USM derives the row count from this and reports it — "8 rows, last row 360 px". |
| Panel widths (px, optional) | The physical panel widths in order along the perimeter, comma-separated — for example 2100, 680, 2100, …. These are guides only, drawn in the Sequence Designer so artwork can be aligned to real panel edges. USM checks the sum against the total perimeter width. Leave empty to design purely in pixels. |
| Uniform panel width (px, optional) | Use when every physical panel is the same width; panel height is taken from the row height. This enables the Panel test pattern, which labels each panel A1, A2 … for wiring checks. For mixed widths, use the panel widths list instead. |
| Corner positions (px) | Where the board turns a corner, measured in pixels from the start of the perimeter. Comma-separated, and shown in the Sequence Designer. |
Panel widths versus uniform panel width
These are two ways of describing the same thing and are used according to the installation. A wall built from one cabinet type takes a single uniform panel width. A wall combining different cabinets — a long straight of 2100 px panels with 680 px infills at the corners, as in the example above — takes the explicit panel widths list. Either way the values only affect what the Designer draws as guides; the wall itself is addressed in pixels.
Output modes and presentation paths
Two settings determine how the rendered channel reaches the display: Output mode, which decides whether the window is fullscreen or windowed, and Output presentation, which decides how frames are handed to the graphics driver. The second setting affects playback speed, so it is worth understanding.
Output mode
Live show
- Borderless fullscreen on the selected display.
- The first panel renders at coordinate (0,0), so the LED processor's mapping starts at the top-left of the signal.
- The mode used for any output feeding an LED processor.
Testing
- Renders into a normal window on the operator's desktop.
- Used for previewing a configuration without an LED wall connected.
- Not intended for live output.
Output presentation
| Option | Behaviour | When to use |
|---|---|---|
| Auto (default) | Follows the output mode: fullscreen resolves to DXGI flip, windowed resolves to OpenGL window. The dropdown label shows which one it currently resolves to. | Normal operation. Correct for both a live wall and a windowed test on the same PC. |
| DXGI flip | Frames are presented through the DXGI flip model. Presentation paces the channel to the refresh rate of the monitor the output window occupies. | Live LED output, where display refresh and channel frame rate are deliberately matched. This is the configuration that removes long-period playback jitter. |
| OpenGL window (classic) | The classic present path. It paces itself from the channel clock rather than the monitor, so playback speed is correct on any display. It retains a minor cosmetic timing variation. | Windowed testing on a monitor whose refresh rate differs from the channel. Also the fallback if a graphics driver initialises flip but renders incorrectly. |
Why windowed output must not use DXGI flip
Because flip paces the channel to the monitor it occupies, a windowed test output on a high-refresh laptop panel takes that panel's rate. A 50 fps channel on a 165 Hz screen therefore plays roughly 3.3× too fast. This is why the presentation setting belongs to the screen rather than the application: a fullscreen wall and a windowed test screen on the same PC need different paths.
Output presentation, output mode and display device describe the physical output rather
than the project's content, so they travel with a .usm export and a screen or project
duplicate, but they are not synchronised to the cloud.
Panels and Free grid
Every screen is created in one of two geometry modes. The mode is fixed at creation and cannot be changed afterwards.
Uniform panel grid
- The wall is defined as a count of identical panels, for example 192 panels of 192×144 px.
- Content is placed per panel and occupies a whole number of panels, snapping to panel boundaries.
- Panels are numbered, so positions can be specified as "start at panel 41".
- Used for perimeters built from a single cabinet type.
Mixed-width panels
- The wall is defined in pixels, for example 27 240 px × 120 px across 8 rows.
- Panels may have different widths, and rows may differ from one another.
- Content is positioned by pixel coordinate rather than panel index.
- Used for irregular installations — mixed cabinets, mid tiers, or walls interrupted by structures.
Zones, brightness and schedules
Brightness is applied at three levels, which multiply: the master fader in the transport bar, per-screen brightness, and per-zone brightness within a screen.
Zones
A zone is a named group of panels within a screen that carries its own brightness value. A typical use is reducing a camera-facing straight for broadcast while the ends remain at full output. Zones are defined by selecting panels on the screen's grid. A panel belongs to one zone. Zone brightness applies to everything rendered in that area, including live sources.
Brightness schedules
Each screen can hold a time-of-day schedule consisting of points such as 18:00 → 70 % and 20:00 → 45 %. USM applies each point as the clock reaches it. Individual points can be muted without deleting them, and a schedule can be copied to all walls in one action. The fader reflects the value currently applied, and a manual change overrides the schedule until the next scheduled point.
Brightness boost
A Playout setting raises the maximum from 100 % to 150 % across zones, faders and sequences. It is off by default. Enabling it changes the meaning of existing 100 % values throughout the project.
Fade to black
FTB in the transport bar fades the screen to black and holds it there. The playlist retains its position and continues to track; releasing FTB restores the picture. FTB is distinct from Stop, which halts advancing but leaves the wall lit.
How media, sequences and playlists relate
USM separates the file, its position on the wall, and its place in the running order into three objects. One media file can therefore be used in many sequences, and one sequence in many playlists, without being duplicated.
Media
A still or video file in the project library.
Sequence
A complete layout of the wall: which media occupies which panels, and the default duration.
Playlist slot
One entry in a running order: a sequence plus a duration and a transition.
Transport
Play, advance, jump and cue actions.
Editing propagation
Editing a sequence changes the layout everywhere that sequence is used. Sync Playlist on the playlist page pushes a sequence edit out to every slot referencing it.
Media library
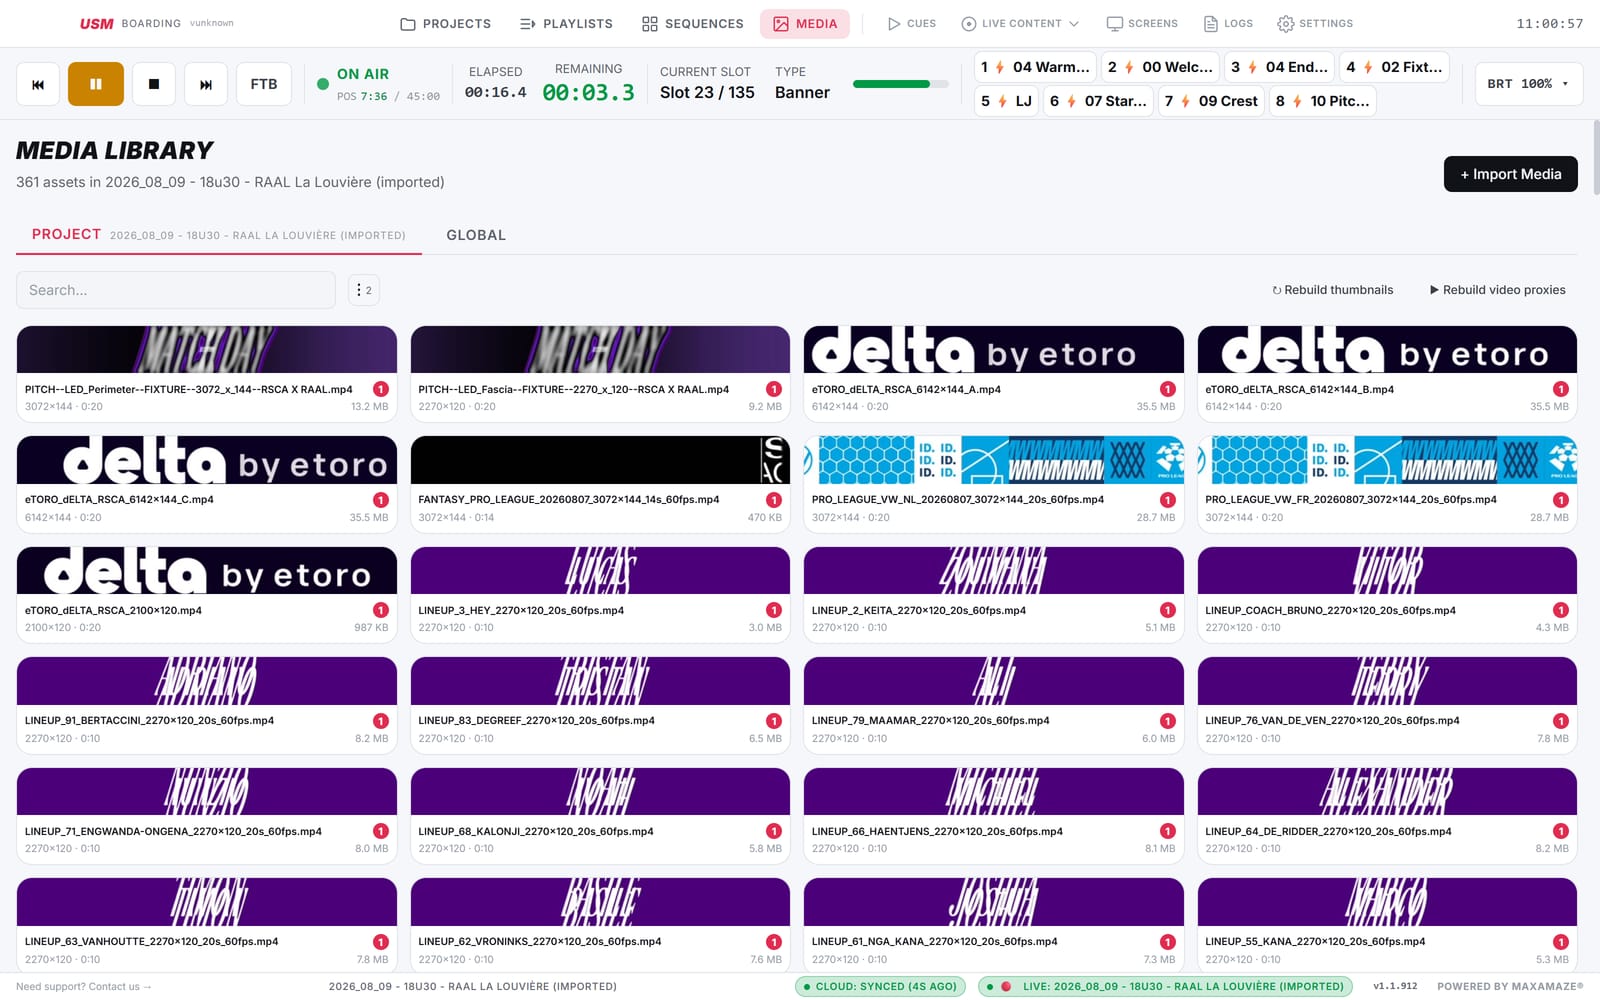
The Media library holds every still and video in the project. Files are added by drag and drop or through the import dialog. USM reads each file's pixel dimensions and derives default values from them rather than assuming an aspect ratio.
Project media and Global media
The library has two tabs. Project lists the files in the project you have open. Global lists every file ever imported into USM on this machine, across all projects.
This event's files
What the open project can place in sequences. Usage counts, filters and rebuild actions all operate on this set.
Everything ever imported
The accumulated library from every project on the machine. A file here can be added to the open project in one click, without importing or copying it again.
The two work together in practice. Artwork that already exists — a league graphic, a returning sponsor, a crest — is taken from Global and added to the project directly. Artwork that is new is imported, which adds it to the project and to Global, so the next event can reuse it the same way.
Importing media
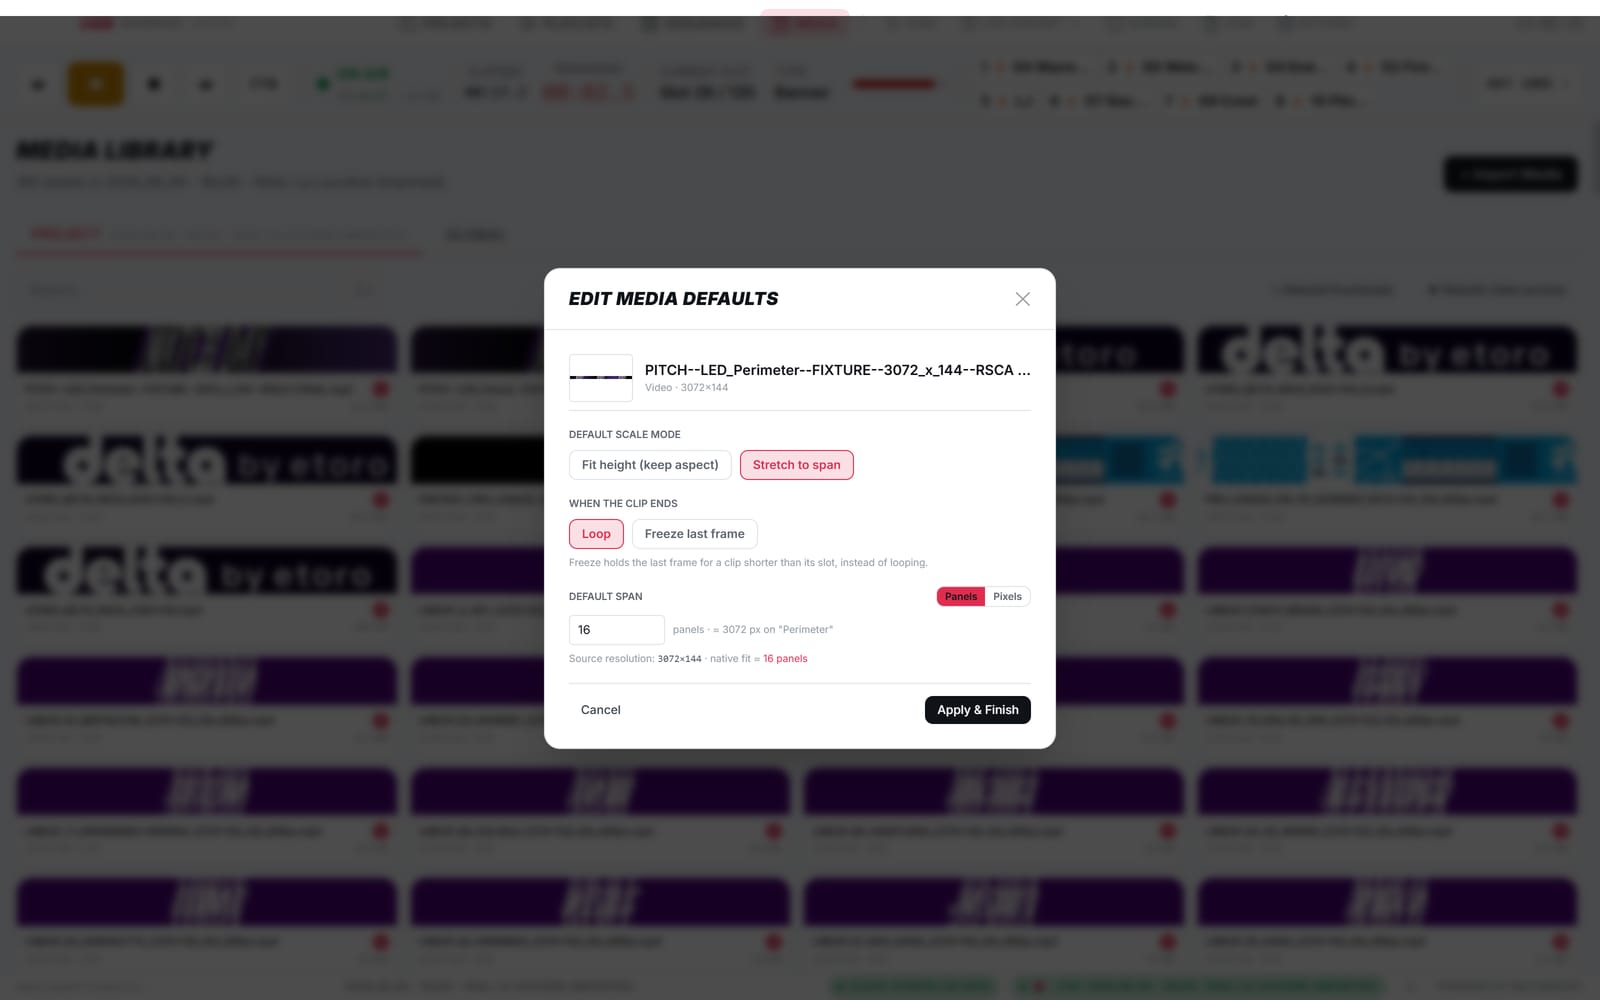
+ Import Media adds files to the project; files can also be dragged onto the library. USM then shows the media defaults dialog. The values set here are stored with the file and applied every time it is placed in a sequence, so they only need to be decided once.
| Field | Options |
|---|---|
| Default scale mode | Fit height (keep aspect) or Stretch to span. |
| When the clip ends | Video only: Loop or Freeze last frame. See the next page. |
| Default span | How wide the media sits on the wall, entered in Panels or Pixels. USM proposes the native fit derived from the file's own resolution. |
Scale modes
Fit height (keep aspect)
The media is scaled so its height matches the wall, and its width follows from the original aspect ratio. Nothing is distorted. Use this when the artwork was supplied at a proportion close to the space it will occupy.
Stretch to span
The media is stretched to exactly fill the span it is given, ignoring its aspect ratio. Use this when the artwork was authored for the strip — most sponsor banners are, since they are supplied at the wall's own extreme proportions.
Later adjustments to an individual placement — crop position and zoom — are made in the Sequence Designer rather than here; these defaults apply to the file itself.
Repeat
Media narrower than the wall can be repeated. Repeat N× places a fixed number of copies. Fill all rows tiles the media across the whole perimeter, folding across row seams and handling a partial last row. A repeat count cannot exceed the number of panels that fit.
Colour correction and video proxies
Per-media colour correction applies RGB gain and offset. The corrected result is baked into a separate copy so playback cost is unchanged, and it previews live in the Sequence Designer.
Separately, USM can generate fast-decode video proxies — re-encoded copies tuned for smooth playback. Rebuild video proxies and Rebuild thumbnails regenerate these after a change. Re-running either when nothing has changed performs no work.
Usage counts
Each media tile shows the number of sequences using it, and the library can be filtered to used or unused files. Multi-select supports removing several files at once, or hard-deleting them from disk.
Loop and freeze last frame
A video banner is frequently shorter than the slot it occupies — a 10-second clip in a 20-second slot, for example. When the clip ends decides what happens for the remainder of the slot.
Restart and keep playing
The clip restarts from the beginning and continues looping until the slot ends. This is the default. Use it for continuous animation, where a repeat is not noticeable or is intended.
Play once, then hold
The clip plays through once and then holds its final frame for the rest of the slot. Use it where the clip animates into a logo or an end card that should remain readable, rather than restarting mid-slot.
Where it is set
| Level | Where | Options |
|---|---|---|
| Per media | Media defaults dialog — on import, or via Edit defaults on the file. | Loop or Freeze last frame. Inherited by every new placement of that file. |
| Per placement | Sequence Designer — right-click the banner → Edit settings. Also available on the pixel ruler. | Video default, Loop or Freeze last frame. Overrides the media default for that one placement. |
The value applied is resolved in this order: per-placement override → per-media default → loop. A placement left on Video default therefore follows whatever the file is set to, and changing the file's default updates every placement that has not been overridden.
Behaviour at playout
- The freeze is scheduled shortly before the clip's natural end, so the held frame is the last frame of the clip rather than a black frame.
- Looping remains enabled underneath as a fail-safe, which guarantees there is always a live frame to hold. A freeze can never result in a black wall.
- A clip longer than its slot is unaffected — the slot advances normally and the clip is simply cut off at the transition.
- A clip whose duration cannot be determined continues to loop.
Stop button behaviour
Settings → Stop button determines what pressing Stop does to running video: Keep looping (the default) leaves clips playing, or Freeze on last frame holds every video on its current frame. This is separate from the per-clip setting above and applies to the Stop action only.
Sequence Designer
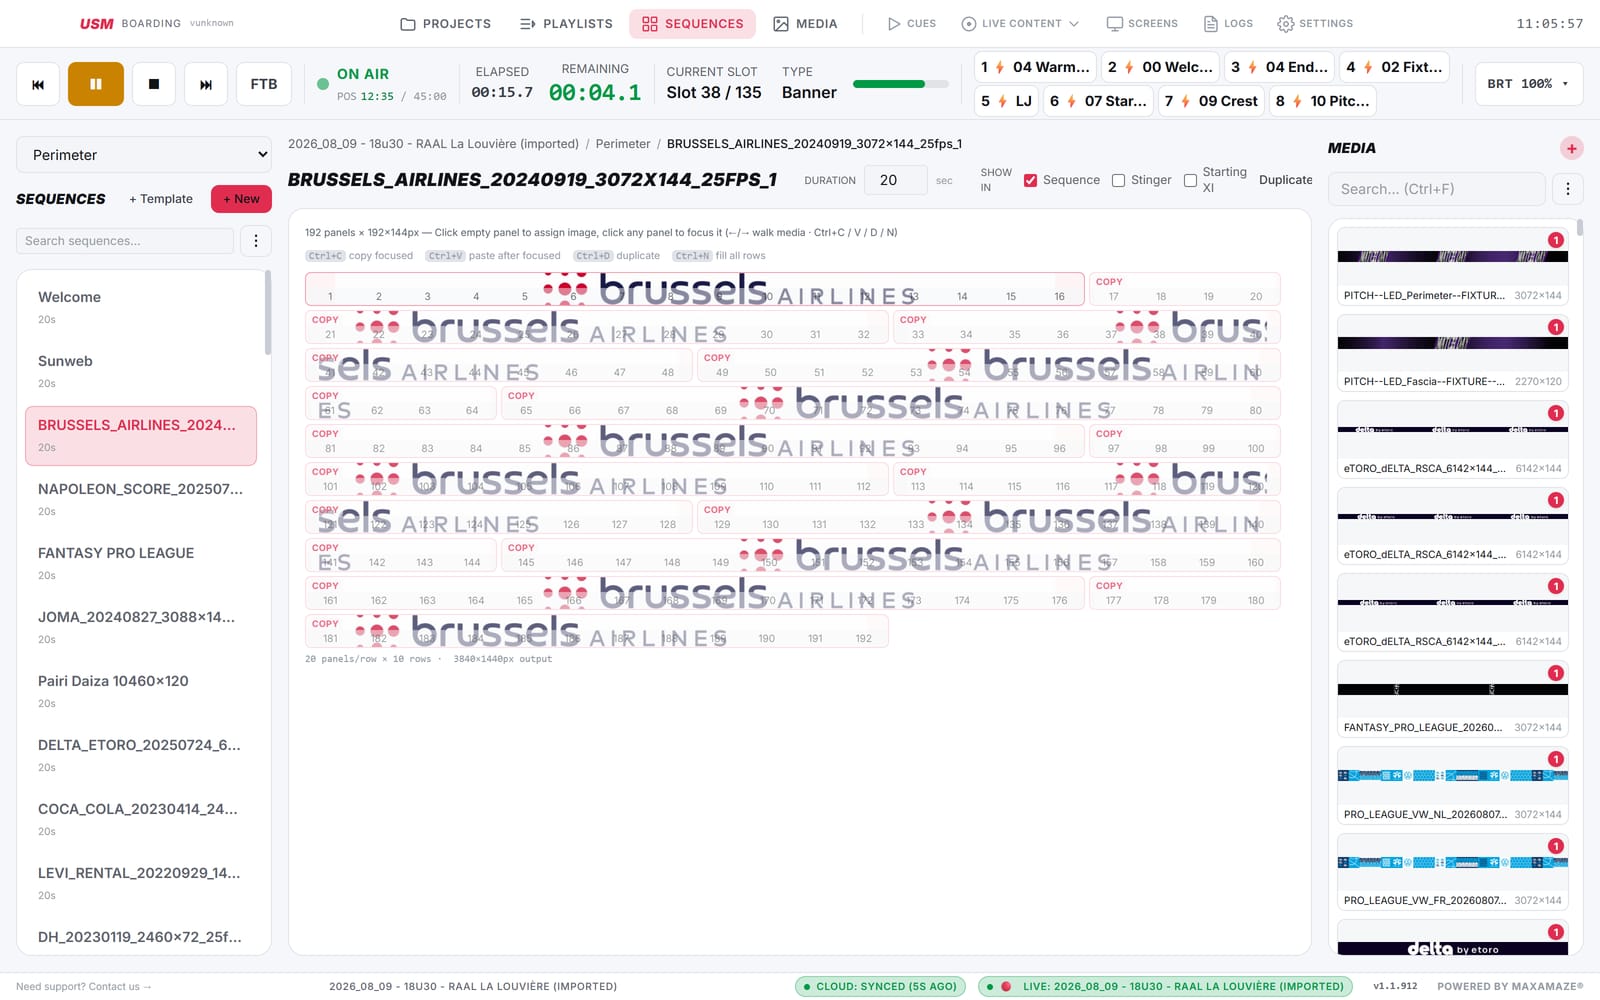
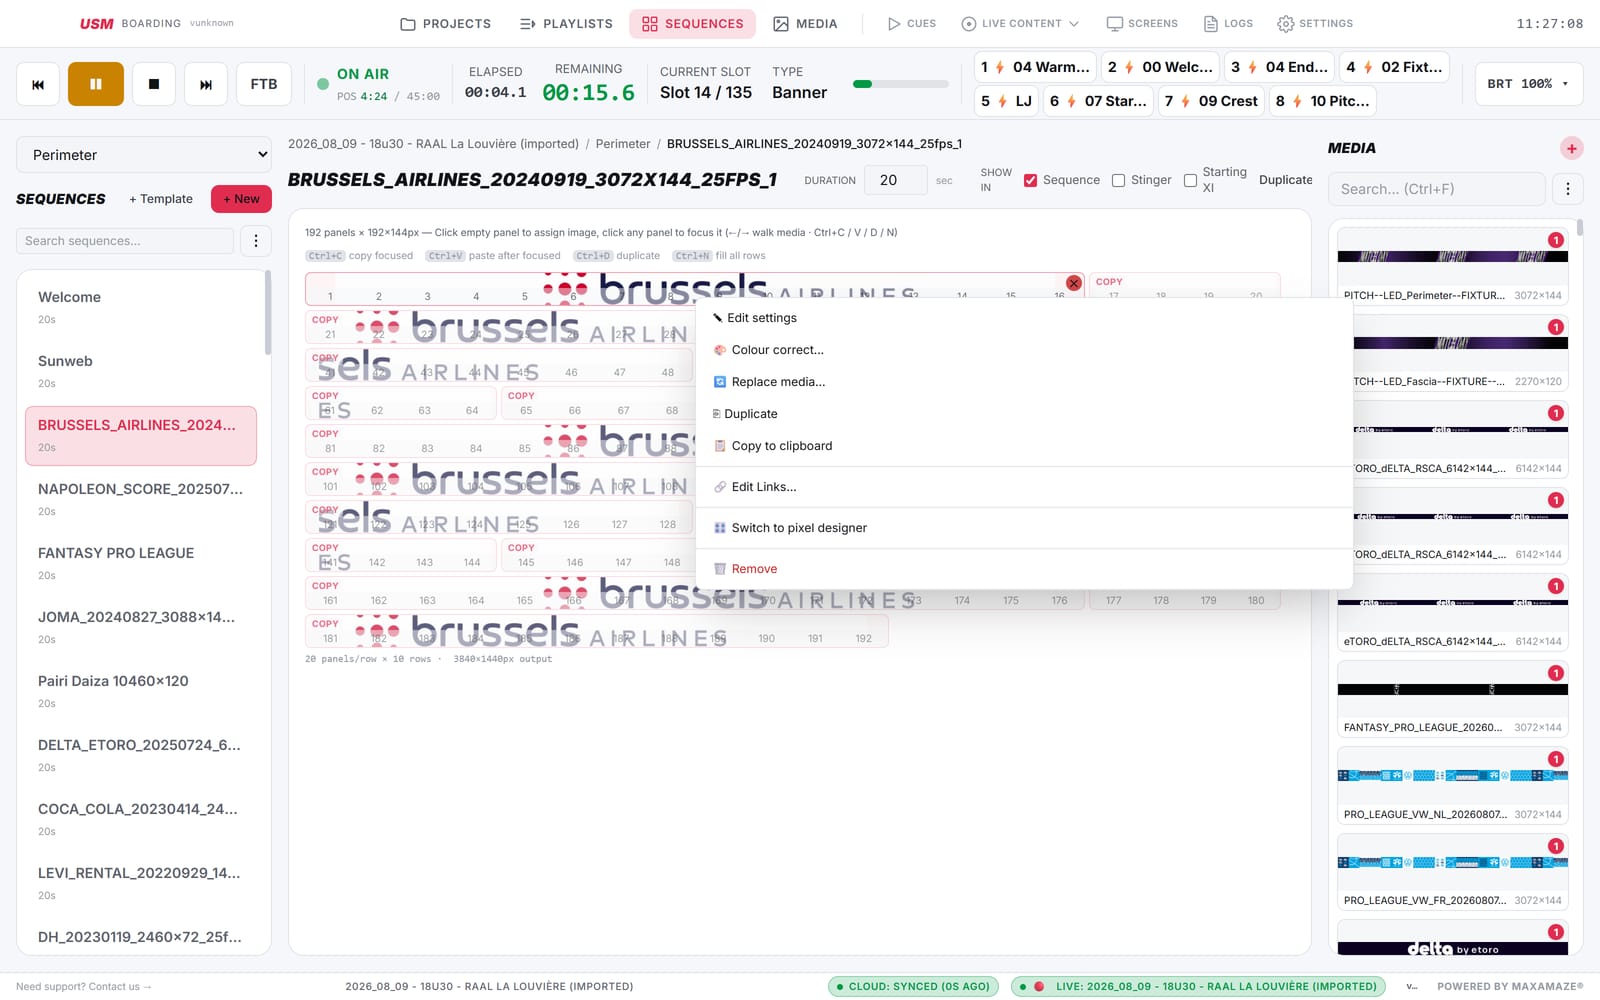
A sequence is a complete layout of one screen: which media occupies which panels. The Designer is where sequences are built. Select a screen, create or open a sequence, and place media until the wall is covered.
Placing media
- Click an empty panel to assign media, or drag a file from the media sidebar.
- Click a placed item to focus it; ← → then step through the media list on that panel.
- Ctrl+N fills all rows with the focused item.
- Ctrl+C copies, Ctrl+V pastes after the focused item, Ctrl+D duplicates.
- Delete removes the focused item.
Role flags
Each sequence carries Show in flags: Sequence, Stinger and Starting XI. These control which pickers the sequence appears in, so that stinger content does not appear in the playlist rail and vice versa. Roles belonging to unlicensed modules are hidden.
Pixel mode
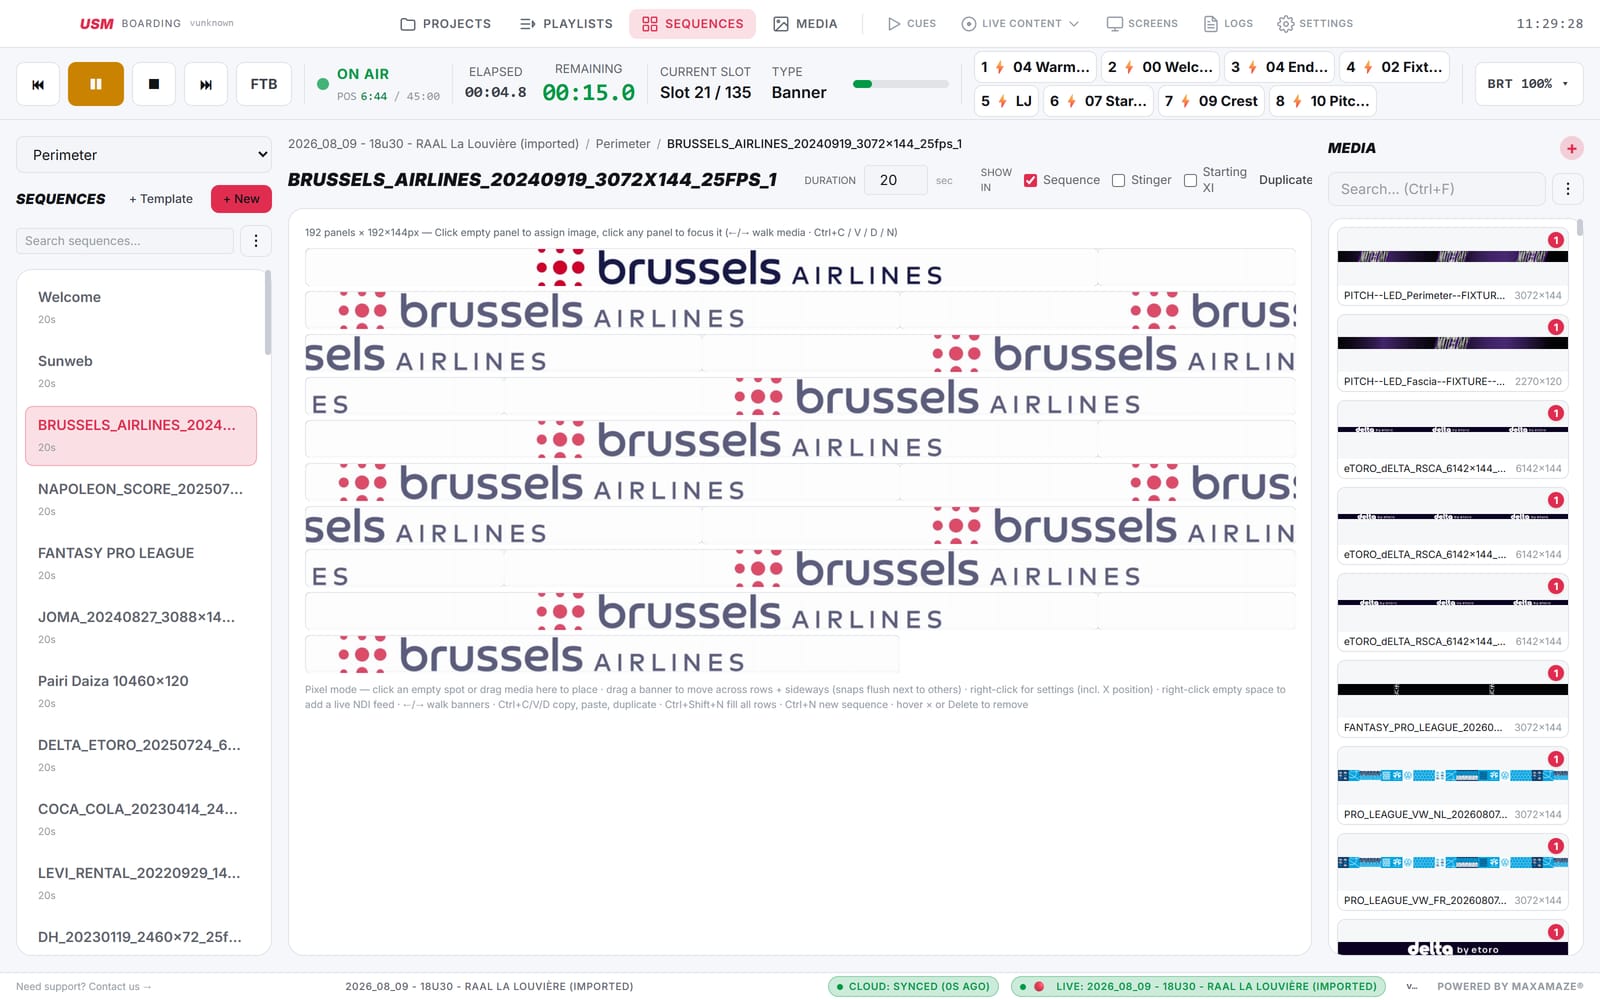
Panels mode snaps content to panel boundaries. Pixel mode removes that constraint for a single sequence, allowing content on a Panels screen to be positioned freely in pixels — the same positioning model a Free grid screen uses. The screen itself is unchanged.
Enabling it
Right-click a placed item in the Sequence Designer and choose Switch to pixel designer. The setting is stored on the sequence, not the screen or project, so one sequence can use pixel positioning while others on the same screen remain on the panel grid. The same menu switches back.
Behaviour in pixel mode
- Click an empty area or drag media in to place it at that position.
- Drag an item across rows and sideways; it snaps flush against adjacent items.
- Right-click for settings, including an explicit X position.
- Right-click empty space to add a live NDI feed.
- ← → step through items; Ctrl+Shift+N fills all rows.
Notes
- Output is unaffected — pixel mode changes the editing model, not the rendered result.
- Free grid screens are always pixel-based; the Designer offers no panel view on them.
- Numeric fields commit when focus leaves them, so clearing a field does not reset it to 1.
Templates and blocked regions
Some areas of a wall are occupied by an overlay rather than by sequence content — a scoreboard on the mid tier during the halves, for example. Those areas must be kept free of banners in the affected sequences, but nothing needs to be played there. Blocked regions reserve the space.
Blocked regions
A blocked region is a keep-out rectangle on the designer canvas. Media cannot be placed or dragged onto it, and it appears as an amber-hatched marker in both the pixel ruler and the panel grid. It never starts a producer at playout. Add one with right-click → Add blocked region, specifying a label, position and width.
Templates
A template is a per-screen sequence holding blocked regions and, optionally, media. Create one with + Template in the Designer. It is seeded from the current positions of that screen's Sources overlays and scoreboard placements, so the regions do not need to be measured manually. Templates are badged as such and are excluded from the playlist rail and the stinger and Starting XI pickers; they cannot be applied to a slot.
| Aspect | Behaviour |
|---|---|
| Applying | Apply template on the New Sequence dialog, or the Template toggle in the Designer header for an existing sequence. The last choice is retained. If a screen has several templates, a picker is shown. |
| Media in templates | A template may contain placed media, which is copied into each sequence created from it. Copied media behaves identically to manually placed media. |
| One per sequence | A sequence can hold only one template. The current one must be turned off before another is applied. |
| Removal | Turning the toggle off deletes only the rows the template added. Manually added media and regions are unaffected. |
| Empty slots | A slot containing only blocked regions counts as empty and is skipped during playout rather than airing black for its duration. |
Templates can be disabled entirely under Settings → Sequence Designer → "Live source templates". Existing blocked regions remain visible and editable when the feature is off.
Playlists and the rundown
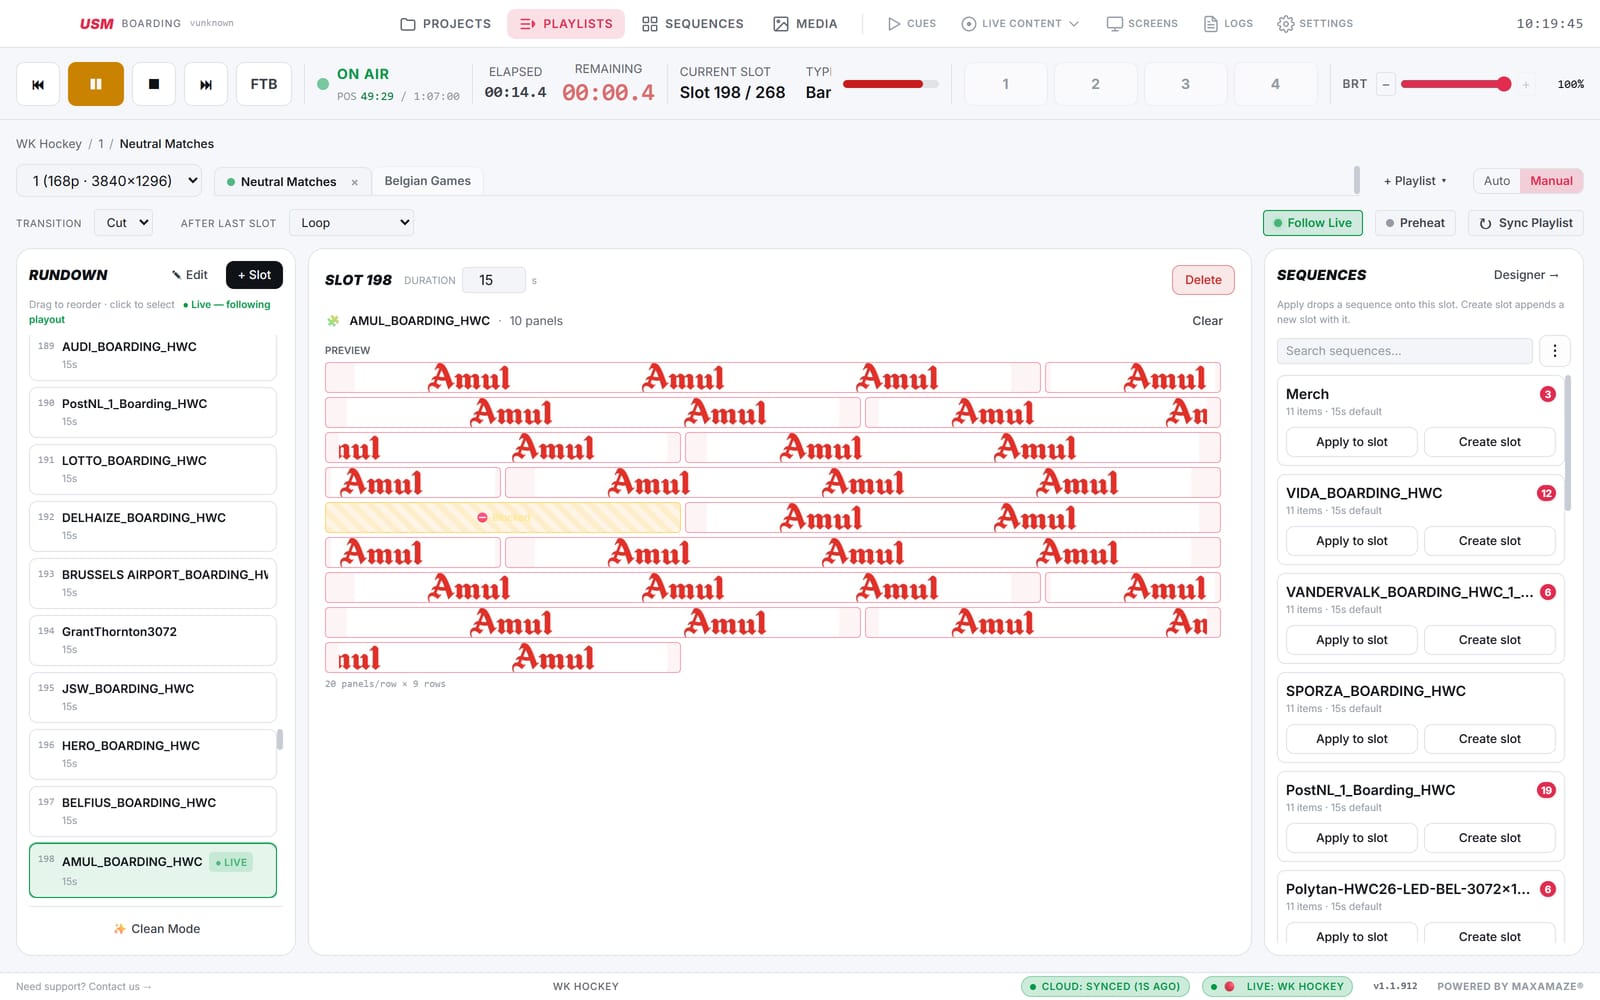
A playlist is an ordered list of slots. Each slot references one sequence and carries a duration and a transition. Playlists appear as tabs above the rundown.
| Control | Function |
|---|---|
| Transition | Cut switches immediately. Mix crossfades the whole perimeter, including video, over a set duration. |
| After last slot | Loop, Hold last frame, Fade to black or Stop playback. |
| Auto / Manual | Whether the rundown advances automatically or waits for operator input. Double-clicking a sequence cuts to it directly. |
| Edit | Enables drag-to-reorder, multi-select and bulk delete. Off by default so a live rundown cannot be reordered accidentally. |
| Preheat | Loads and warms every still and video in the playlist in advance. |
| Sync Playlist | Applies a sequence edit to every slot referencing that sequence. |
| Follow Live | Scrolls the rundown to keep the on-air slot visible. |
| Clean Mode | Hides the sequence rail to enlarge the preview. |
Empty slots
A slot with no airable content is skipped rather than left black for its duration. The rundown marks it Empty.
Weighted playlists
Sponsorship is normally contracted as a number of exposures rather than as fixed list positions. The weighted builder generates a rundown from a repeat count per sequence, distributing the repeats evenly and preventing identical items from appearing consecutively.
Repeat counts
Each sequence is given the number of times it should appear across the playlist.
Spacing
USM constructs the order deterministically rather than drawing at random, so repeats are evenly spaced and never adjacent.
Contract slots
Specific positions can be reserved, and selected sequences can be forced to open the playlist.
Multi-screen weighted groups
Where a sponsor holds inventory on more than one screen, both walls must show that sponsor at the same time. The multi-screen builder plans a synced group from a grid of sponsors against screens and produces paired playlists whose corresponding slots align. Synced groups are marked in the playlist tabs, and editing one member warns that the pair is linked.
Shuffle
Shuffle uses the same spacing constraints rather than a random draw, because a random order produces visible clustering of the same sponsor.
Auto-fill
For a simple rotation, auto-fill builds a playlist directly from the project's media: one sequence per file and one slot per sequence. Duplicate protection prevents the same file being added twice.
Transport bar
The transport bar is fixed above every page, so playout control remains available while editing. It is the primary control surface during an event.
| Control | Function |
|---|---|
| ⏮ ⏭ | Previous and next slot. Stepping manually disables auto-advance; the wall then holds on the selected slot. |
| ▶ / ❚❚ | Play and pause. Pause freezes the picture, including video, and stops the countdown. |
| ■ | Stop. Halts advancing but leaves the current content on the wall. It does not black the output. |
| FTB | Fades the screen to black and holds. Playlist position is retained. |
| Quick buttons | Eight assignable buttons for stingers and live sources, with state feedback. |
| BRT | Master brightness, adjustable in 1 % steps. |
State display
The bar shows ON AIR or READY — NOT ON AIR, followed by Elapsed and Remaining for the current slot to a tenth of a second, the current slot number and total, the slot type, and a progress bar. Controls are greyed out when the engine is offline or idle.
ON-AIR clock modes
Settings → Playout → ON-AIR clock selects what the clock reports:
- Played time (default) — elapsed wall-clock time the playlist has been on air, counting while advancing and frozen on pause or stop.
- Rundown position — the position reached within the rundown. In a playlist of 20-second slots, jumping from slot 1 to slot 6 reads 1:40 rather than the time actually played. This mode is labelled POS in the transport bar, because the two clocks are visually identical but report different values.
Single Mode
Single Mode is the default view: one screen selected, one playlist on air, one rundown displayed. It is used for single-screen installations and when working on one wall of a multi-screen rig.
Typical sequence of operation
Before the event
Open the project, start the screens, run Preheat.
Pre-match
Start the pre-match playlist in Auto so it rotates unattended.
Start of play
Fire the relevant cue. On a multi-screen rig this moves all screens together.
During play
Playlist runs; fire stingers and jump slots as required.
Auto and Manual
Auto advances each slot for its exact duration on a frame-accurate timer that does not accumulate drift over a long period. Manual holds each slot until the operator advances. Manual is used where content follows individual competitors — equestrian classes, for example, where each entry has its own slot and the operator advances as they enter.
Switching playlists during playout
Selecting another playlist tab while live stages the incoming content and crosses over without a black frame. Transport state is preserved: switching while paused remains paused, and switching while held on a step remains held.
Multi Mode
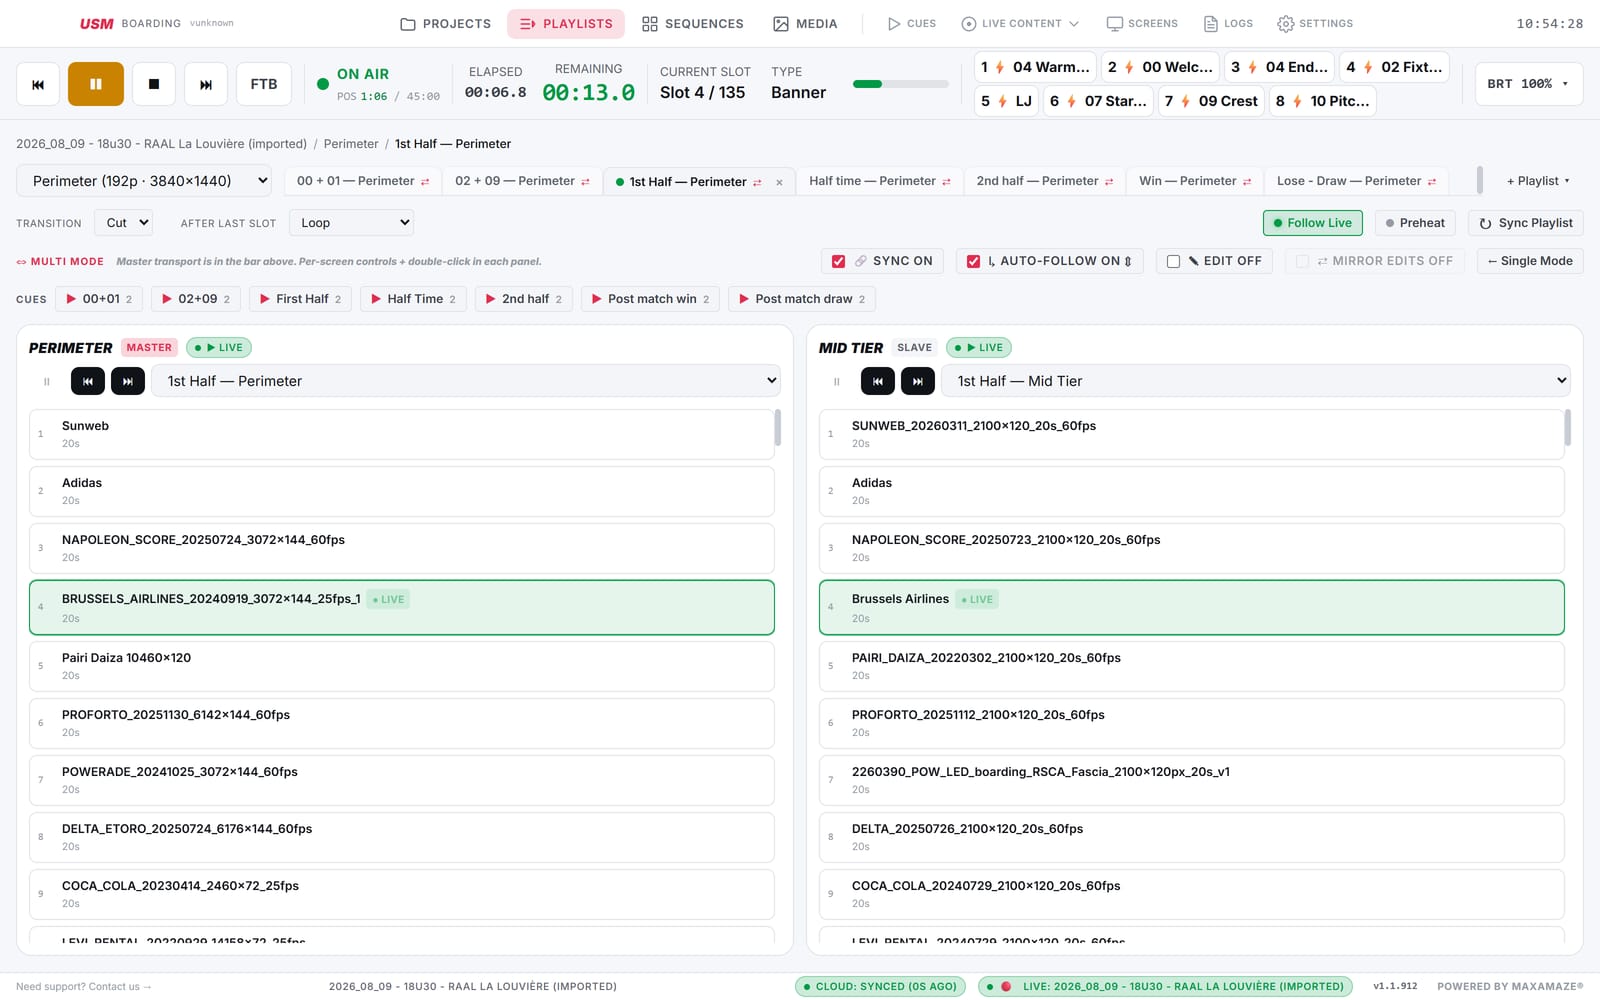
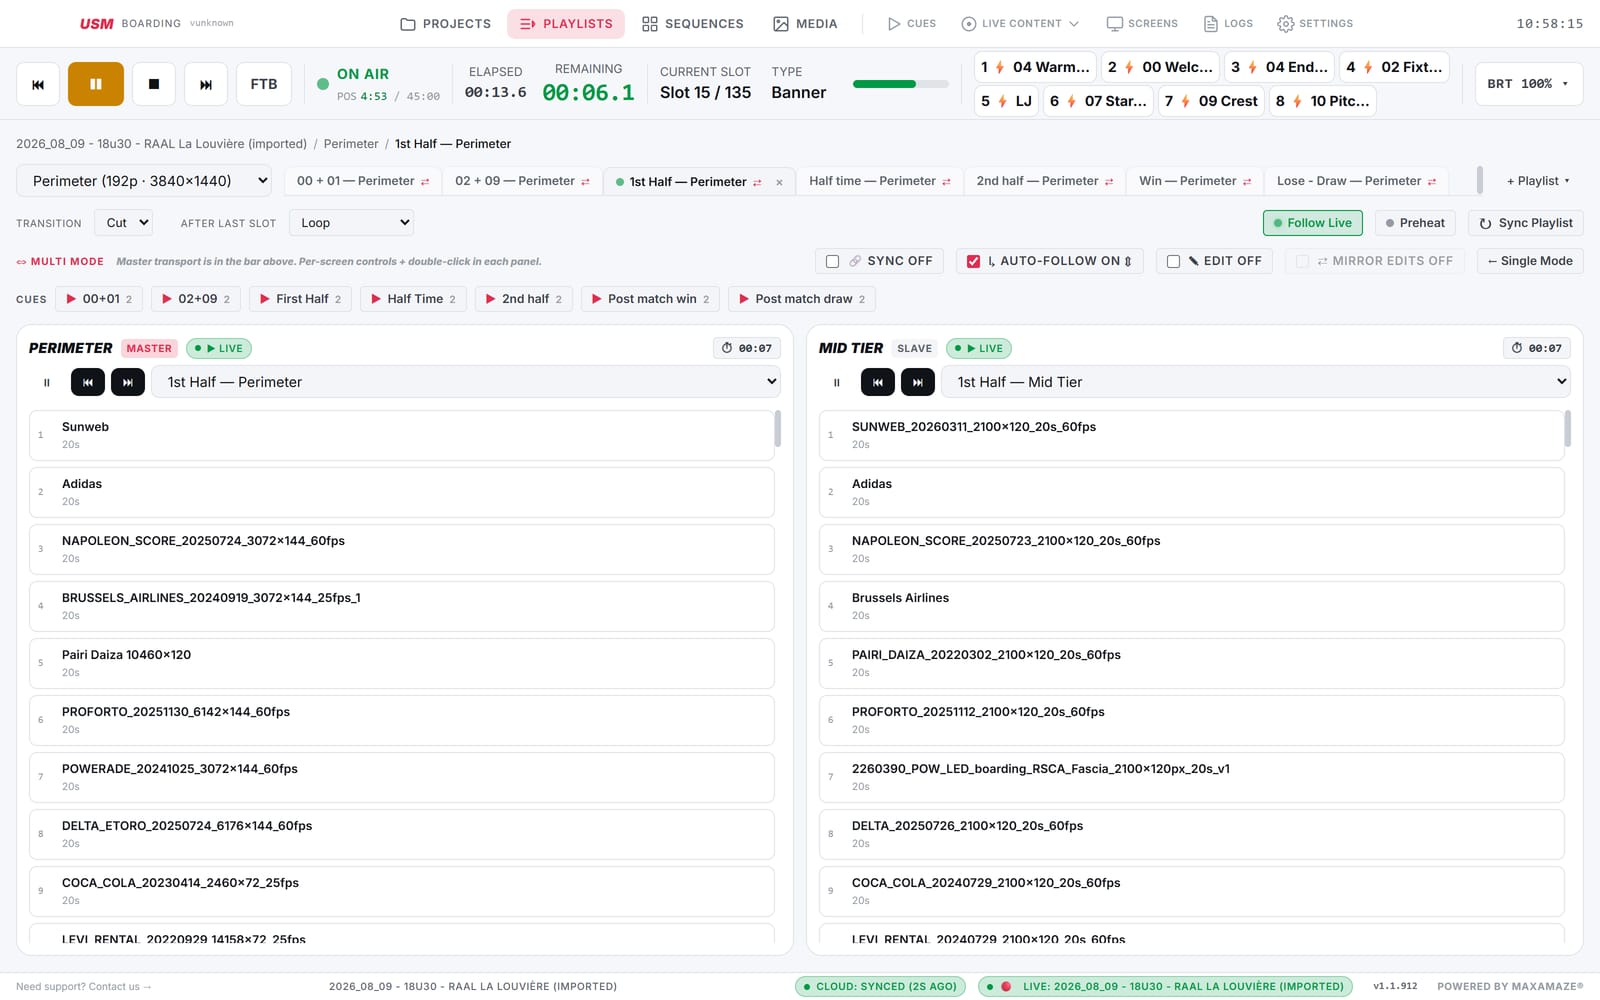
When a project contains more than one screen, Multi Mode displays them side by side. Each screen has its own playlist, rundown and transport controls, below the master transport in the bar above.
| Toggle | Enabled | Disabled |
|---|---|---|
| Sync | The master transport drives all screens; one Play, Next or Stop applies to every wall. | Each screen runs on its own clock with its own transport controls and countdown. |
| Auto-follow | Slaves follow the master's playlist changes by position, so a cue on the master also moves the partner playlist. | Each screen retains the playlist assigned to it. |
| Edit | Rundowns become editable in place. | Rundowns are read-only. |
| Mirror edits | An edit on one screen is applied to its partner. | Screens are edited independently. |
Frame rate matching
Two screens can be switched together regardless of frame rate, but they only remain in step if their frame rates match. USM warns when configured rates differ; a 50 Hz and a 30 Hz screen will cross over on the same command and then drift apart.
Cues
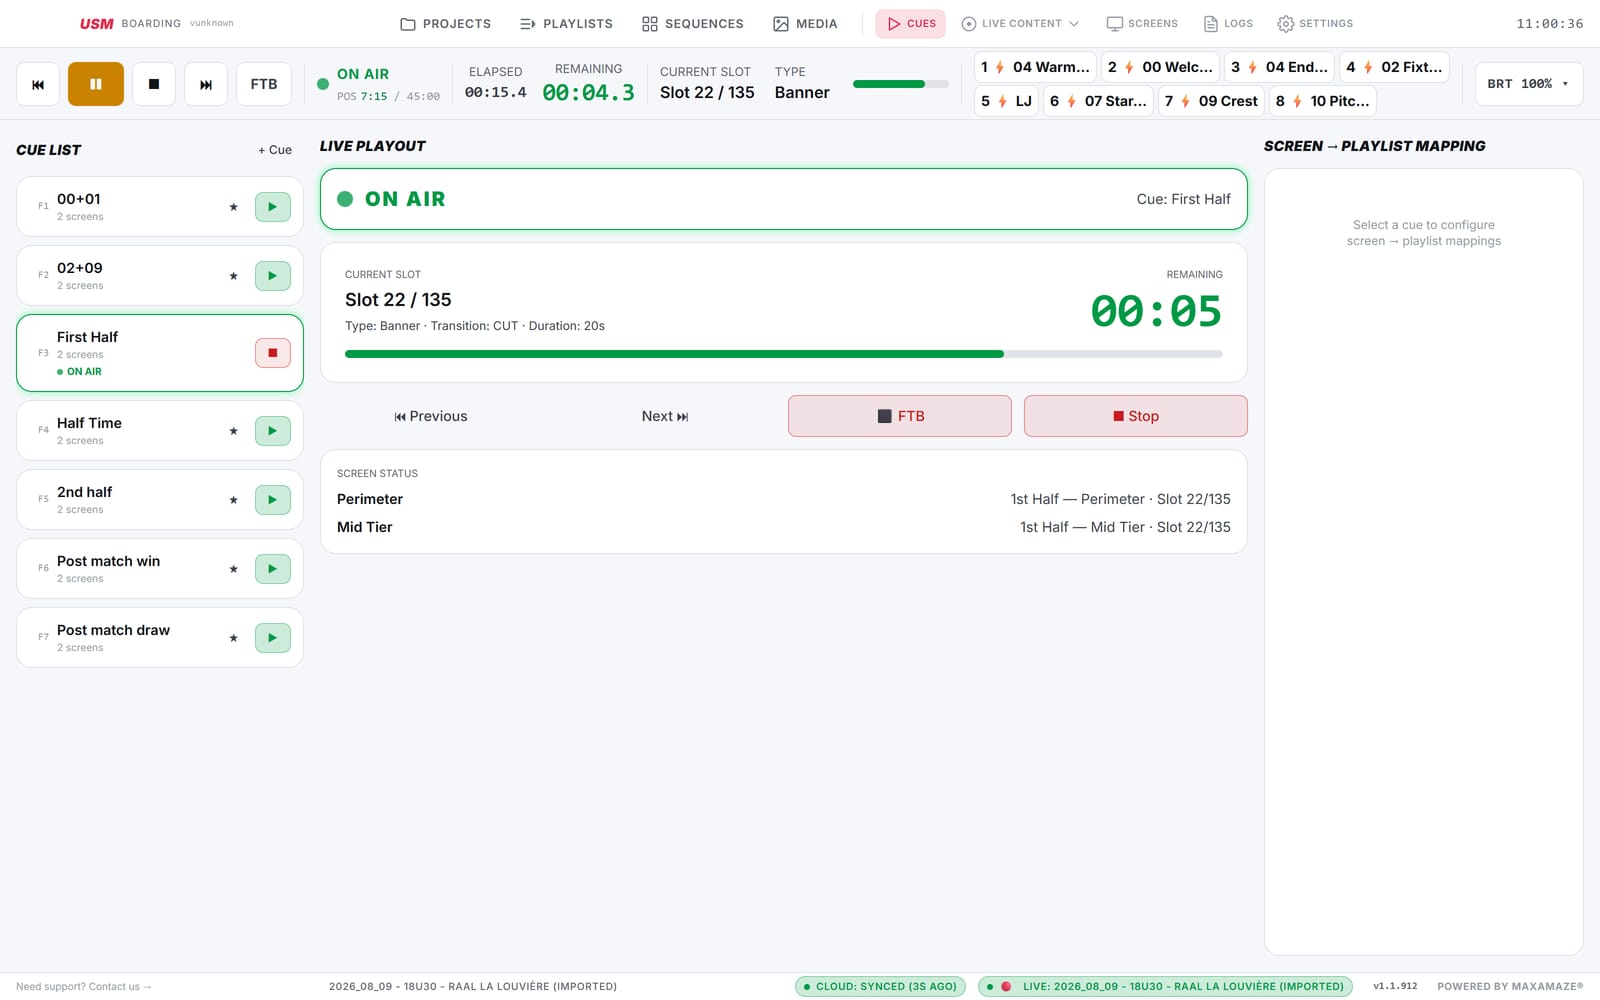
A cue is a named action that sets every screen to a defined state in one command. Cues are used for scripted points in an event such as kick-off, half time and post-match.
What a cue defines
- A playlist per screen, so multiple walls change to their paired rundowns together.
- Optionally a start sequence rather than only a playlist, so the cue opens on a specific item.
- The start position is positional: a pin to slot 2 continues to mean the second slot after the playlist is reordered.
Execution
A cue is staged and synchronised: incoming content is prepared on hidden layers while the outgoing content remains on the wall, then all screens reveal at the same instant. No black frame occurs on either wall.
Cue priority
A cue pressed while a screen is waiting on another operation — for example a stinger still preparing on its partner screen — cancels that wait. The screen completes its pending reveal immediately and the cue proceeds. This prevents one screen's preparation from blocking cue commands on another.
Live content overview
Live content is anything rendered on top of, or in place of, the running playlist. All of it composites over the rotation without requiring it to be stopped. Each type is configured under the Live Content menu.
Live feeds
NDI, browser pages and DeckLink capture, positioned on the wall and shown on demand.
On-demand sequences
A sequence fired over or in place of the playlist.
Typed text
Text rendered along the perimeter, one message per side.
Score and clock
Managed scoreboard with match control, output to the wall or over NDI.
Line-up by position
Players revealed individually by line-up position.
Line-up by number
The same reveal addressed by shirt number.
Live sources
A source is a live input composited over the running playlist. Three types are supported: NDI feeds from the network, browser pages, and BlackMagic DeckLink capture cards.
Layer budget: 12 per project
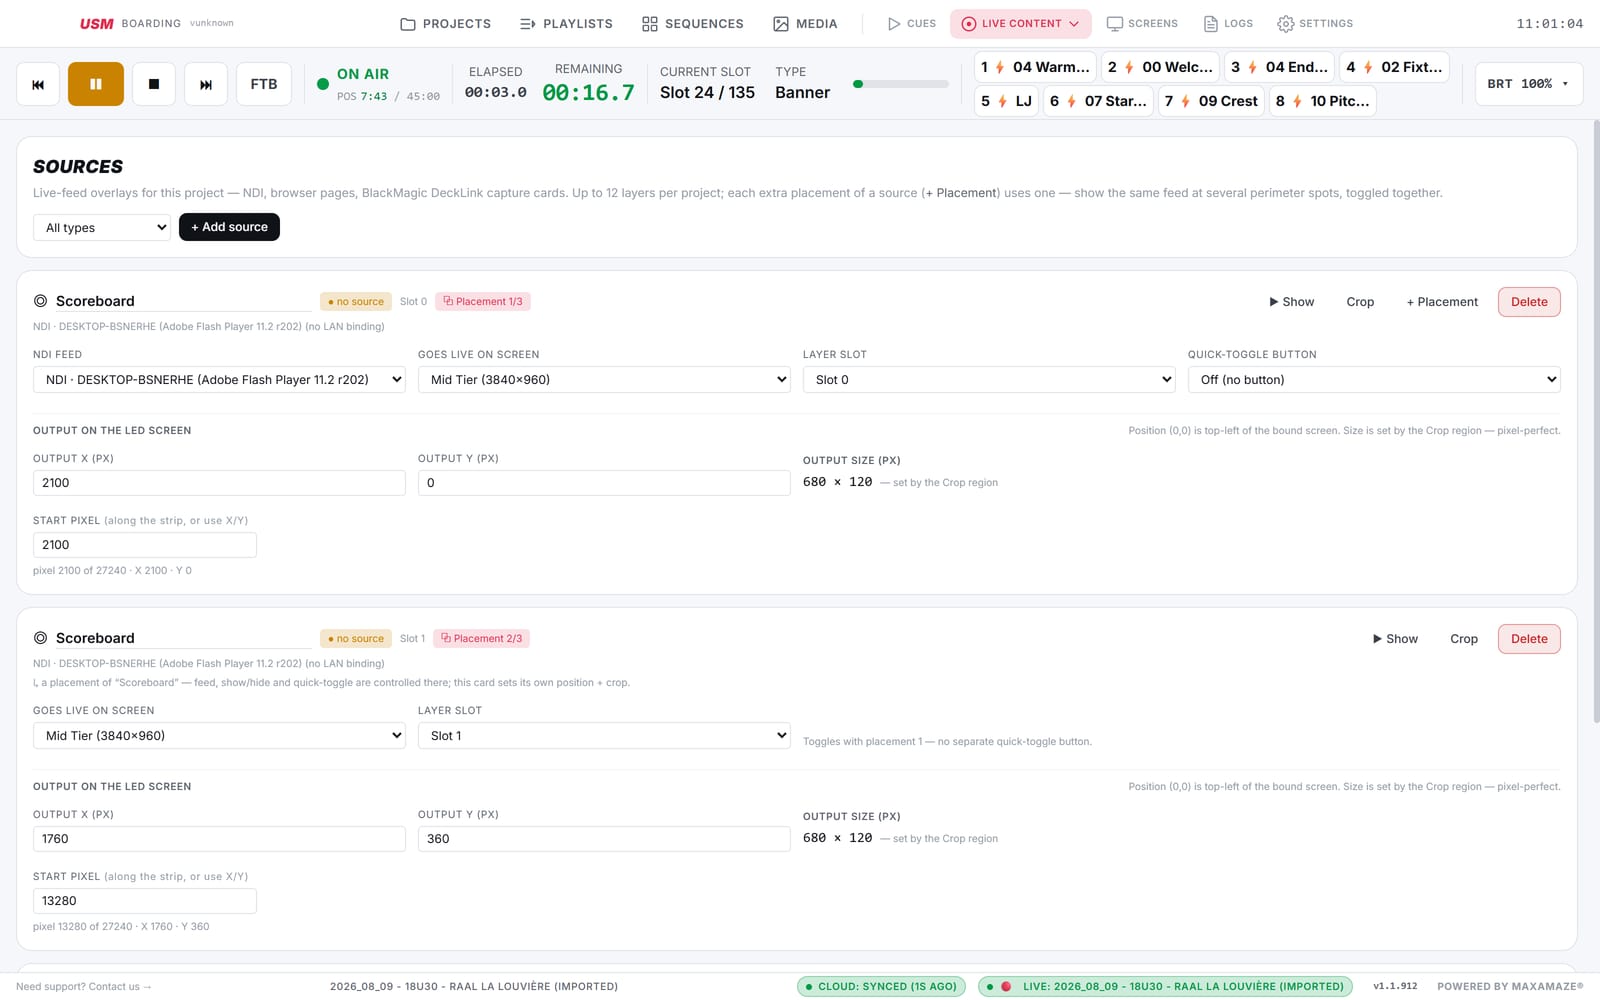
A project has 12 layer slots, shared by everything on this page. Each NDI feed, browser page and capture card consumes one slot, and each additional + Placement consumes one as well. Three other sources in a project therefore leave nine slots for placements of a camera feed.
Placements
A single feed often needs to appear at several positions around the perimeter. + Placement adds another position for the same source. The feed selection, show/hide state and quick-toggle button are controlled from the first card; each placement card defines only its own position and crop. All placements of a source are shown and hidden together.
Position and crop
Position is specified in pixels with (0,0) at the top-left of the bound screen. A position can be entered as X and Y coordinates or as a start pixel along the strip — for example pixel 13 280 of 27 240. The output size is determined by the crop region rather than entered separately, which makes the result pixel-exact.
The Crop editor defines which rectangle of the incoming frame is used, with separate scale and zoom controls. This is normally required: a 16:9 camera frame mapped across a strip of roughly 20:1 is unusable, so a horizontal band is cropped from the frame instead. A cropped feed folds across row seams, with each row showing its own horizontal slice of the cropped image.
Quick-toggle buttons
A source can be assigned to one of the transport bar's quick buttons. Placements share the button of their parent source.
Sources inside sequences
A live feed can also be placed inside a sequence, making it part of that slot's layout rather than a separate overlay. In the Designer, right-click empty space and add the feed.
NDI
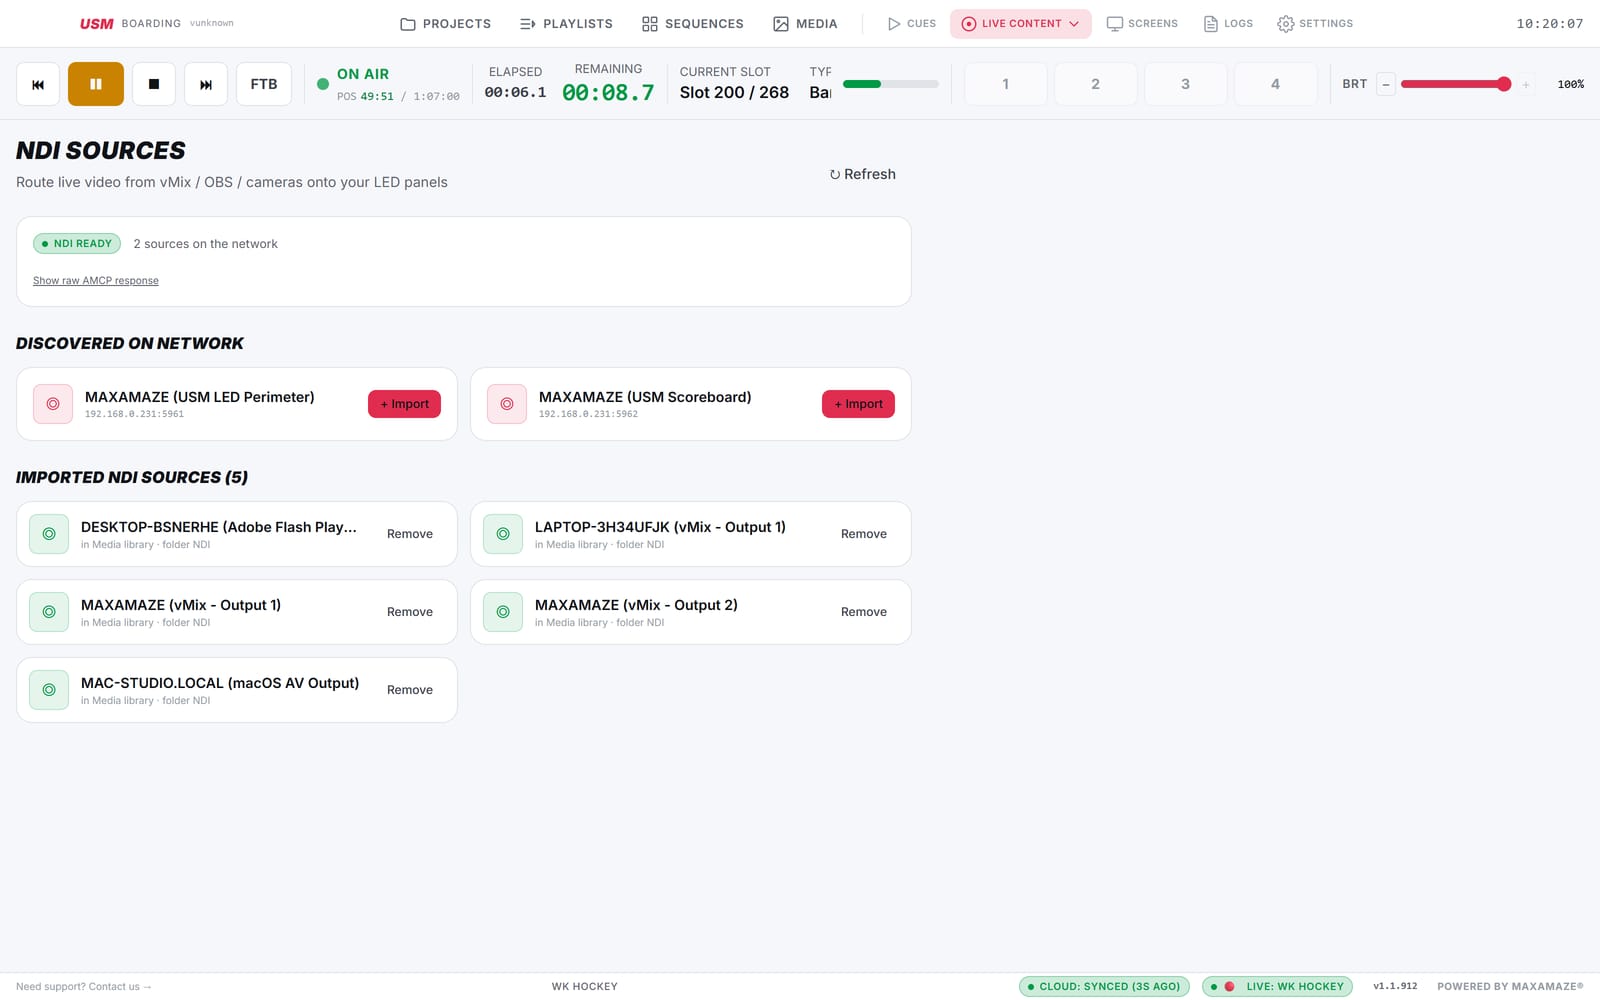
NDI carries video between machines over a standard network. USM discovers available senders, receives feeds for use on the wall, and can transmit its own output.
| Direction | Function |
|---|---|
| Receive | Bind a discovered sender to a source, a sequence placement or a scoreboard position. The crop editor previews the live feed. |
| Send | USM can transmit over NDI. The most common use is the scoreboard, allowing a vision mixer such as vMix to take it without involving the LED signal chain. |
| Monitor | Bound feeds are monitored; the operator is alerted when a source becomes unavailable or returns. Alerts are scoped to the active project. |
"No source" state
A placement showing "no source" is configured but is not receiving data. Verify that the sender is running, that it appears under NDI discovery, and that both machines are on the same subnet.
Stingers
A stinger is a named sequence fired on demand over or in place of the running playlist — for example a goal graphic, a sponsor takeover or a substitution graphic. Each stinger is bound to one sequence and configured once.
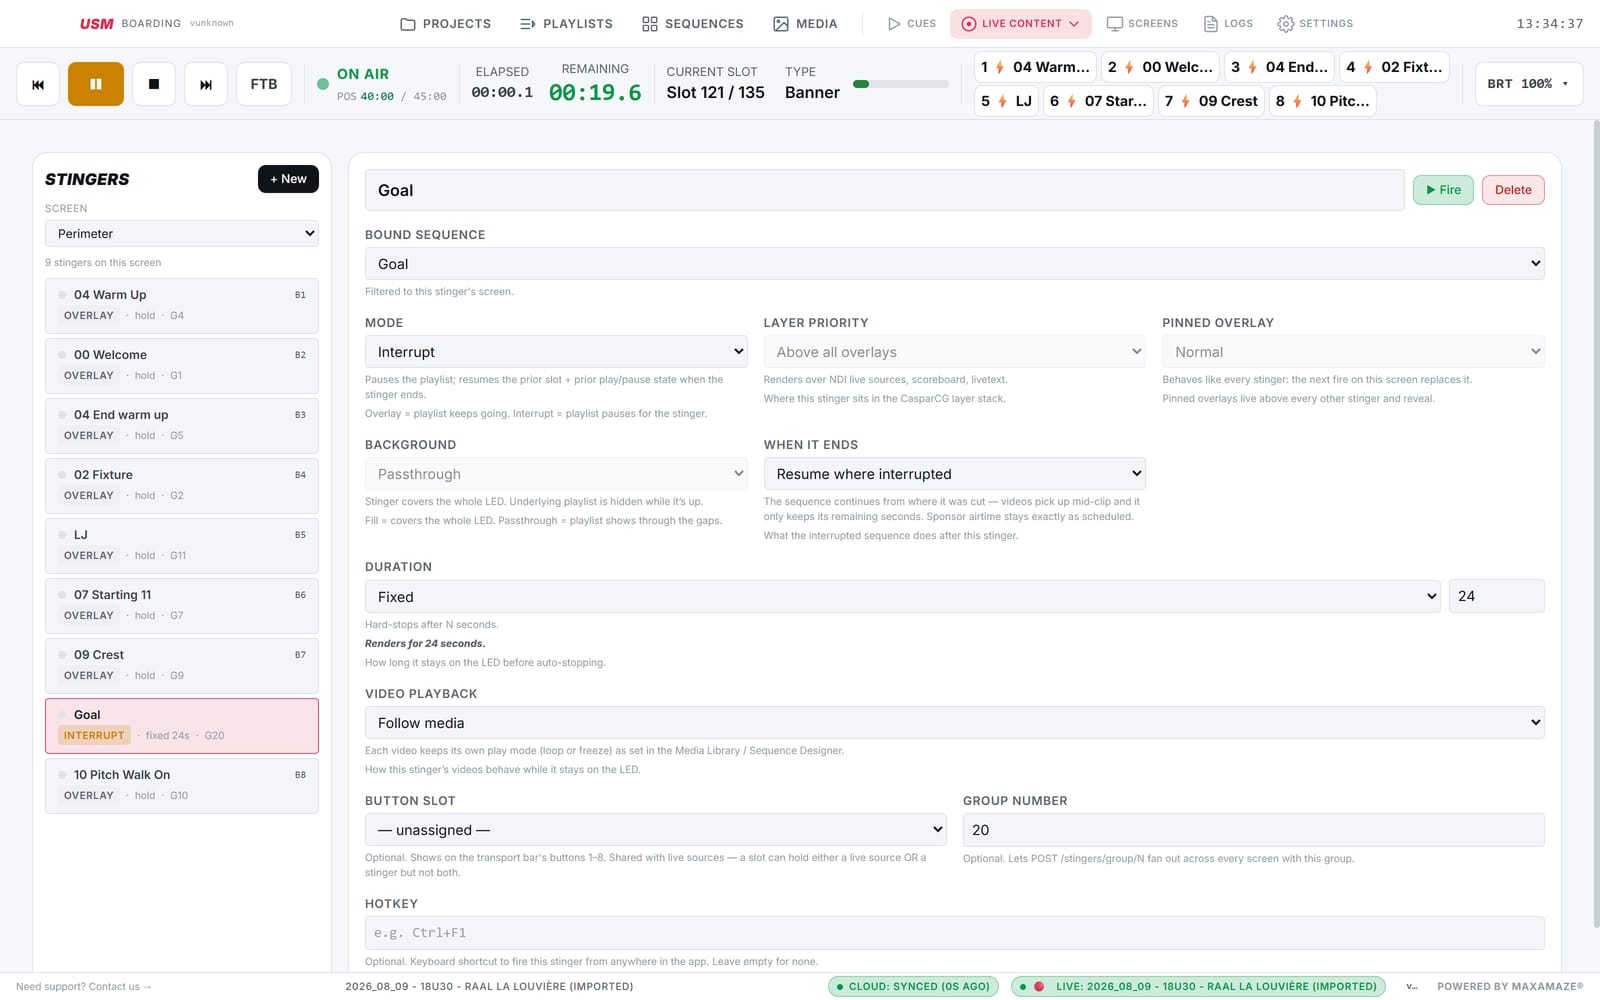
Settings
| Field | Options | Effect |
|---|---|---|
| Bound sequence | Any sequence flagged for stinger use | The content the stinger plays. Filtered to the stinger's own screen. |
| Mode | Overlay · Interrupt | Overlay leaves the playlist running. Interrupt pauses it and restores the prior slot and its play/pause state afterwards. |
| Layer priority | Above all overlays · Below overlays | Where the stinger sits in the layer stack — above renders over NDI sources, scoreboard and LiveText. |
| Pinned overlay | Normal · Pinned — always on top · Pinned — hide during other stingers | Normal means the next fire on that screen replaces it. Pinned overlays sit above every other stinger and reveal. |
| Background | Fill background · Passthrough | Fill covers the whole LED. Passthrough lets the playlist show through the gaps in the sequence. |
| When it ends | Restart sequence (classic) · Resume where interrupted | What the interrupted sequence does afterwards. See below. |
| Duration | Fixed (seconds) · Once · Hold (until stop) | How long it stays on the LED before stopping by itself. |
| Video playback | Follow media · Loop · Freeze last frame | How this stinger's videos behave while it is on the LED. |
| Button slot | Unassigned, or buttons 1–8 | Places it on the transport bar. Slots are shared with live sources — a slot holds one or the other, not both. |
| Group number | Any number | Fires together with every stinger sharing that number, across screens. |
| Hotkey | A key combination | Fires the stinger from anywhere in the application. |
Modes
Composited over the playlist
- Renders above the running playlist without stopping it.
- Can use a transparent background so the playlist remains visible in the gaps.
- The playlist clock continues to run.
- Used for partial-width graphics.
Replaces the playlist
- Takes over the channel; the underlying slot is suspended.
- The playlist clock is frozen for the duration of the stinger.
- Used for full-wall takeovers.
- See the resume setting below, which affects exposure accounting.
Duration and video playback
| Duration | Behaviour | Video playback option |
|---|---|---|
| Once | Runs for the bound sequence's declared duration. | Not offered — each clip uses its own play mode, which the sequence duration already reflects. |
| Hold | Renders until stopped manually. | Follow media, Loop or Freeze last frame. |
| Fixed | Runs for a specified number of seconds. | Follow media, Loop or Freeze last frame. |
Follow media is the default and leaves each clip's own play mode unchanged. Loop forces every video in the stinger to loop; Freeze last frame forces each to play once and hold. Live NDI inside a stinger is never forced, as a live feed has no end point.
When it ends — restart or resume
Set per stinger, and it affects sponsor accounting:
- Restart sequence (classic) — the interrupted slot starts again from the beginning for its full duration. The sponsor in that slot therefore receives more exposure than booked, and because goal stingers coincide with match events the surplus accumulates over a season.
- Resume where interrupted — the sequence continues from the point it was cut. Videos pick up mid-clip and the slot keeps only its remaining seconds, so booked airtime stays as scheduled.
Stinger groups and firing behaviour
A stinger group is a number shared by several stingers. Firing the group fires every member. Groups are used on multi-screen rigs where the same graphic must appear on all walls simultaneously.
Group fire sequence
- All members start at the same time; the fan-out is parallel rather than sequential.
- Each screen performs its preparation on hidden layers — composite parked in the background, videos warmed — while the outgoing content remains on air.
- Each screen reports ready. At one instant, all screens issue their reveal. Measured on a test harness, two screens reveal within about 1 ms of each other.
This applies to the transport bar's cross-screen buttons, the external control group endpoint, and the redundancy slave's mirrored fire.
Peer wait timeout
A screen that is ready waits a maximum of 1.5 seconds for its partner, measured from the first screen becoming ready. After that the ready screens reveal and the remaining screen follows when it completes. A consistently large spread indicates a cold composite or differing decoder counts on one screen, which is addressed by preheating or by reviewing sequence geometry.
Other behaviour
| Take-to-take swap | Firing a second stinger while one is active swaps directly between them without showing the playlist in between. Enabled by default. |
| Pinned overlay | A stinger that remains on top until dismissed rather than hiding and returning. |
| Countdown | An active stinger displays its remaining time in the navigation bar. |
| Stop all | Clears every active stinger in one action. |
| Logging | Stinger fires and interrupts are recorded in the audit log, so proof-of-play records remain complete. |
LiveText
LiveText renders typed text on the wall. Text flows continuously along the perimeter rather than wrapping as a paragraph, because the wall is a single continuous line.
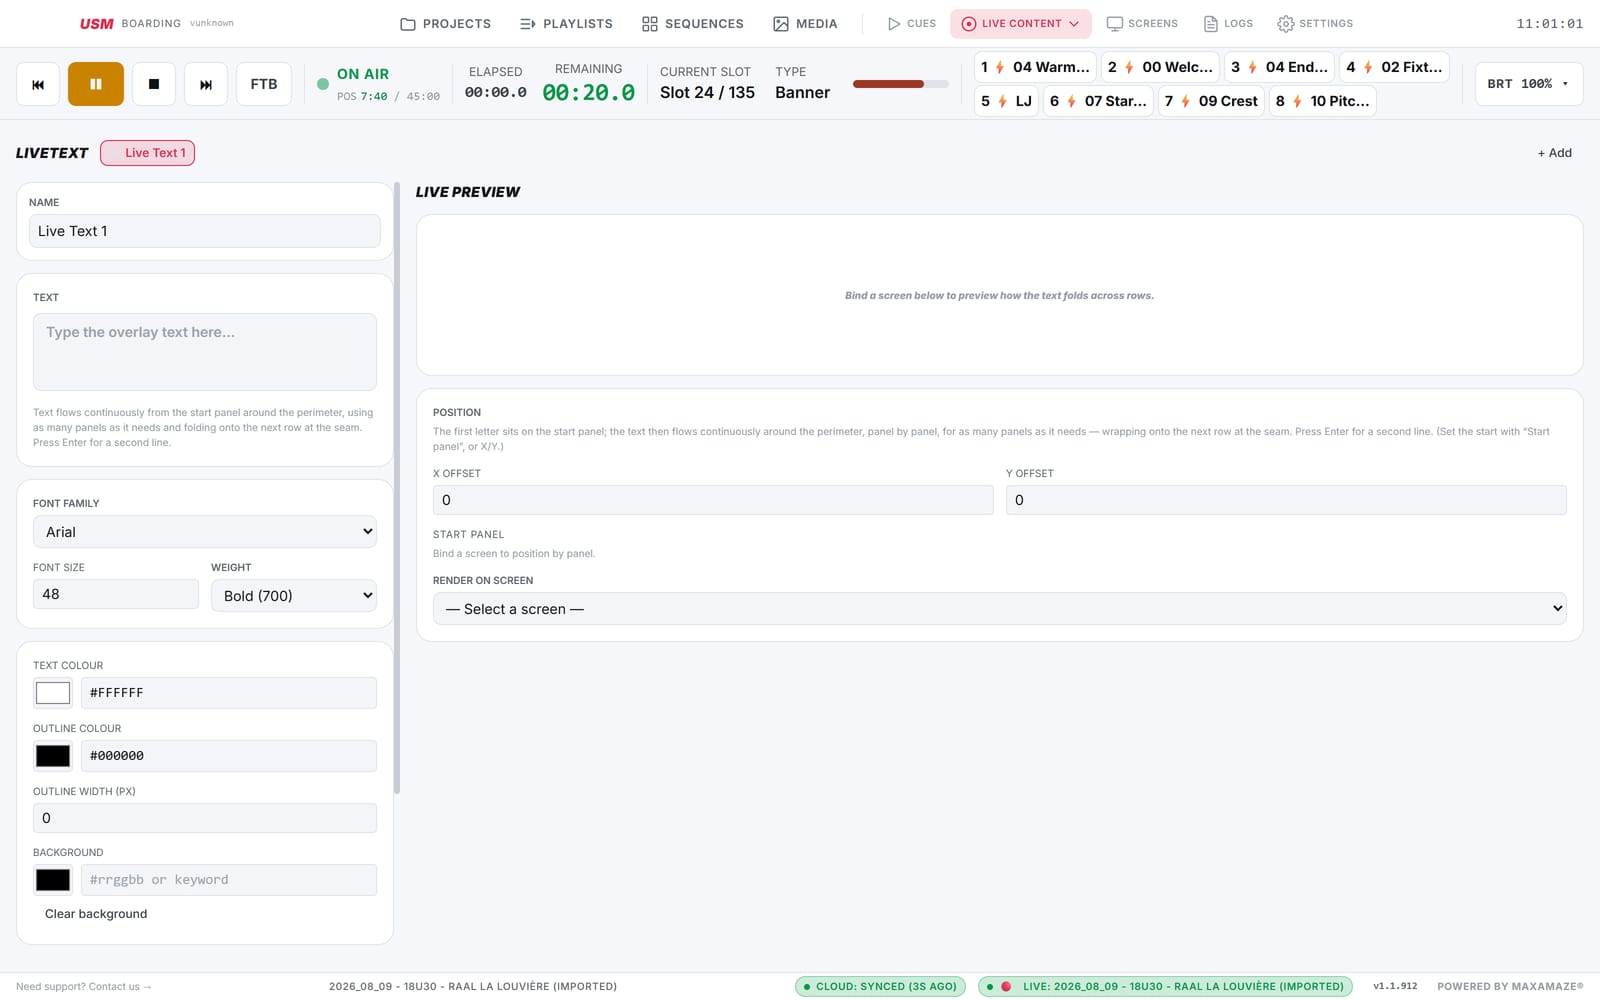
- Multiple texts per project — typically one per side of the perimeter, each activated independently.
- Folding — panel-height lines wrap correctly across row seams, with a live width readout.
- Background sizing — the background runs from the start panel to the last character rather than filling the whole row.
- Activation — messages can be assigned to transport bar quick buttons.
Scoreboard and match control
USM includes a scoreboard providing team names, crests, score and a match clock. It is rendered either onto the wall as a placed source or transmitted over NDI.
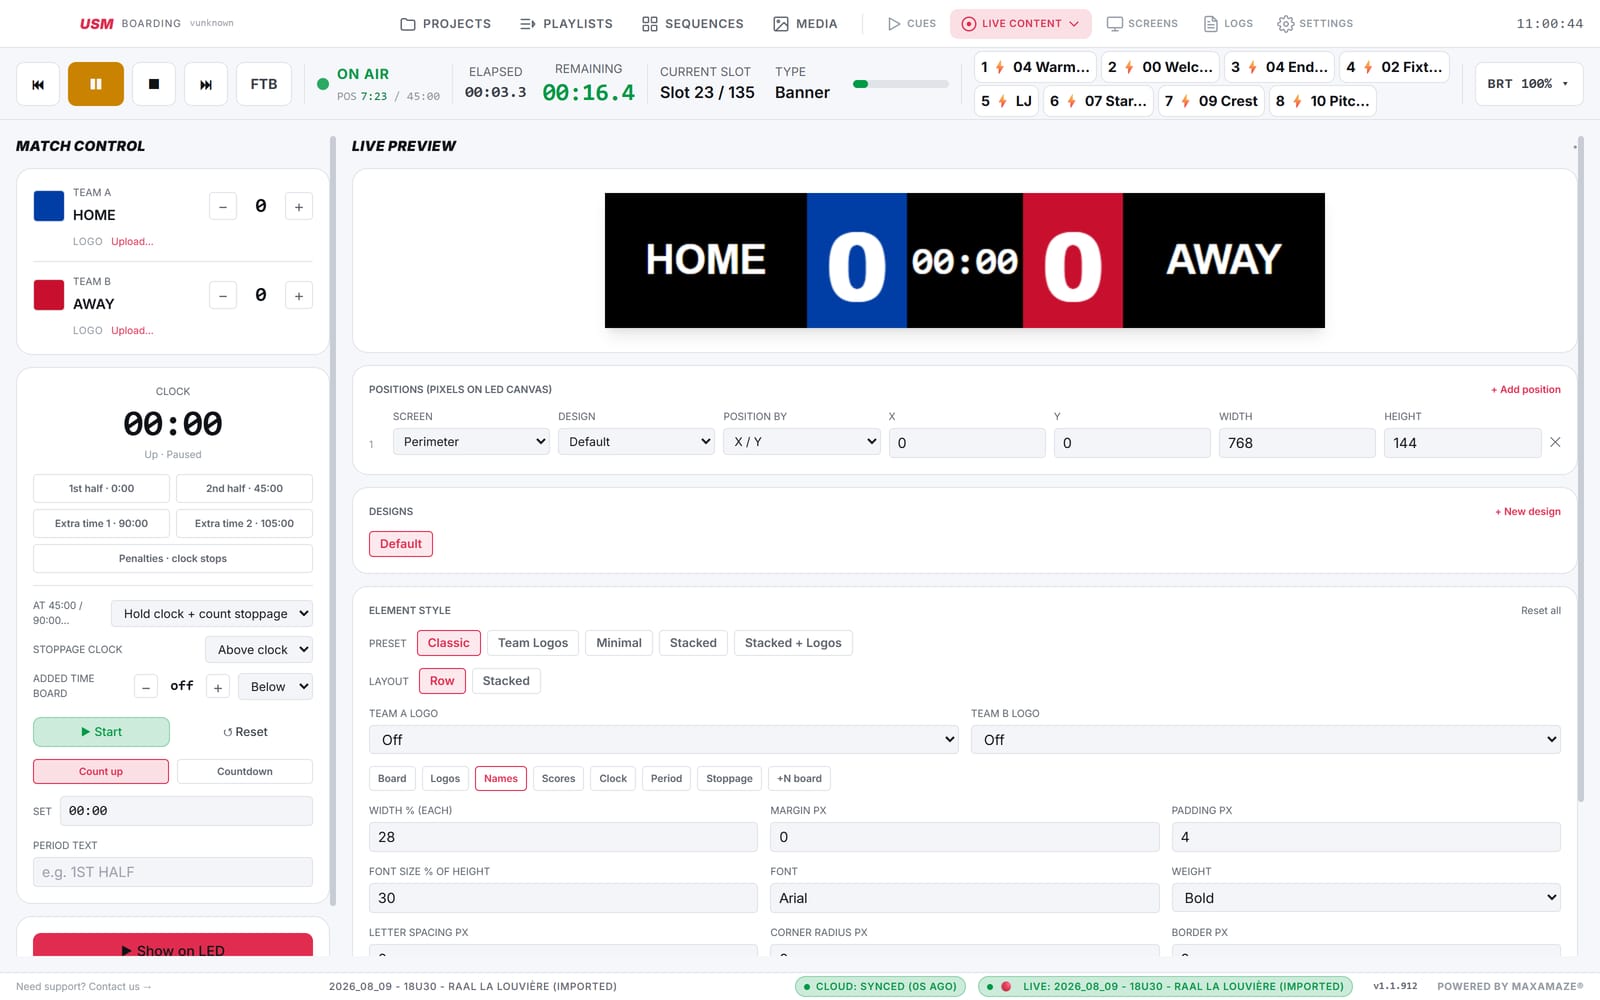
| Match Control | Function |
|---|---|
| Phases | Kick-off, half time, second half and so on. Selecting a phase seeds the clock at that period's nominal start; the second half begins at 45:00. |
| Goals | Increment either side, with an undo action for corrections. |
| Stoppage | Freezes the clock and displays added minutes. The added-time display clears automatically at the next phase. |
| Output | Render to the LED wall as a positioned source, or transmit over NDI for use by a vision mixer. |
The scoreboard can also be driven from an external trigger or control surface, allowing a timing system or a control panel to maintain the clock.
Starting XI and Squad
Both modules display a team line-up on the wall, revealing players individually during the team announcement. They differ in how a player is addressed.
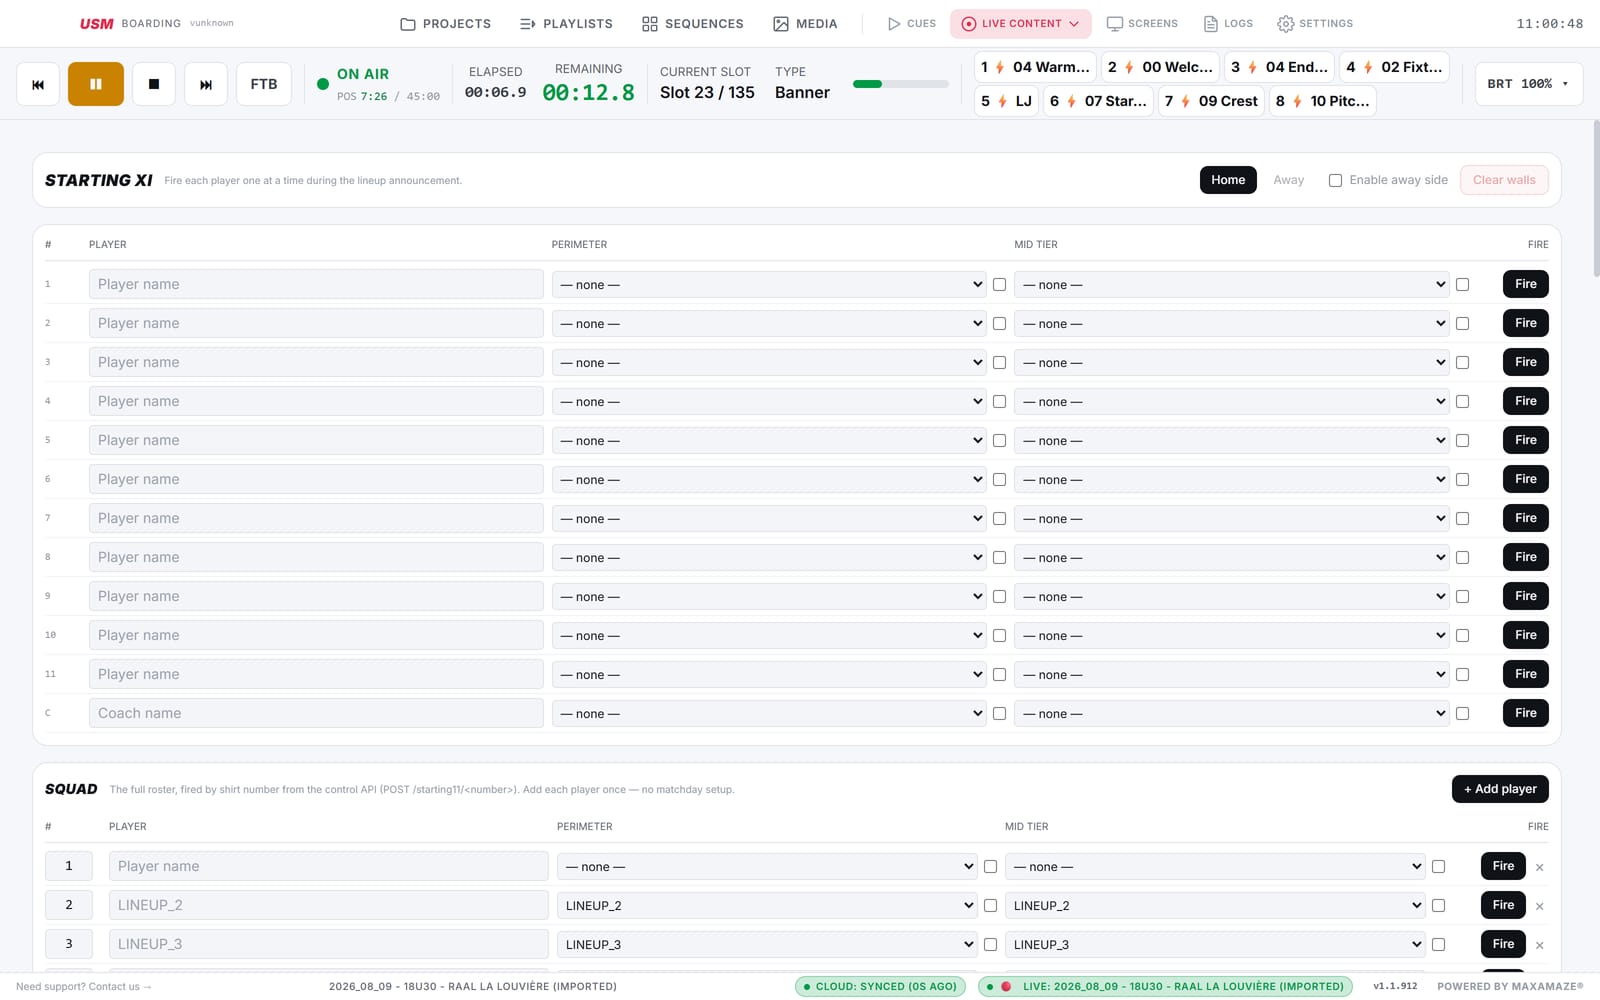
Starting XI — addressed by position
- Slots 1–11 for the team, slot 12 for the coach.
- Buttons are bound to positions, so the same button reveals whoever occupies that slot.
- Players are revealed in order as names are announced; clearing returns to the previous content.
Squad — addressed by shirt number
- Players are addressed by shirt number rather than line-up position.
- Used where the announcement order is not known in advance.
- A player cannot be selected twice within the same list.
Reveal method
Each reveal is prepared on hidden layers and then flipped, so no black frame occurs between players. On a multi-screen rig all screens reveal at a shared instant.
Perimeter scroll
Perimeter scroll moves the entire board loop around the pitch as one continuous image rather than cutting between banners. It is a licensed module, enabled per licence key.
- Scroll intent is stored per sequence, so a playlist can mix scrolling and static slots.
- Motion is frame-locked to the output, producing continuous movement rather than stepping.
- Supported on Free grid screens with variable row widths as well as uniform panel walls.
GPU load
Perimeter scroll is the most GPU-intensive function in USM. Test it on the target machine at the production resolution and frame rate before using it for a broadcast event.
External interfaces
USM accepts commands from control surfaces and timing systems, can mirror itself to a second machine, and records what was played for reporting. This part covers those interfaces.
External control
USM runs a local HTTP and WebSocket control interface. Any device or program that can send an HTTP request can drive playout — a Stream Deck via the bundled Companion module, a vision mixer, a timing system, or a script.
| Setting | Default |
|---|---|
| Base address | http://127.0.0.1:12500 |
| LAN access | Off. Settings → External Control exposes the interface to the network when a control surface runs on another machine. |
| Authentication | None. The operator's network is assumed trusted when LAN access is enabled. |
Available commands
Transport
Play, pause, resume, next, previous, stop and fade to black, globally or per screen.
Playlists and slots
Start a named playlist, open a specific slot with or without auto-advance, jump within the current rundown.
Cues
Fire a named cue, moving all screens together.
Stingers
Fire, stop or toggle by name or id; fire a group across screens; stop all.
Sources
Show, hide or toggle a live source; stop all sources.
Line-ups and scoreboard
Reveal players by position or shirt number; drive match control.
Address format
Command parameters are carried in the URL path rather than in a request body, so a control surface only needs to issue a POST to a fixed address. Names are matched case-insensitively and tolerate punctuation differences: Round 1, round-1 and Round%201 all resolve to the same playlist. A WebSocket endpoint reports state changes, which is how control-surface buttons show current state.
The full endpoint reference is included in the application. Settings → External Control links to it, and the application serves it locally.
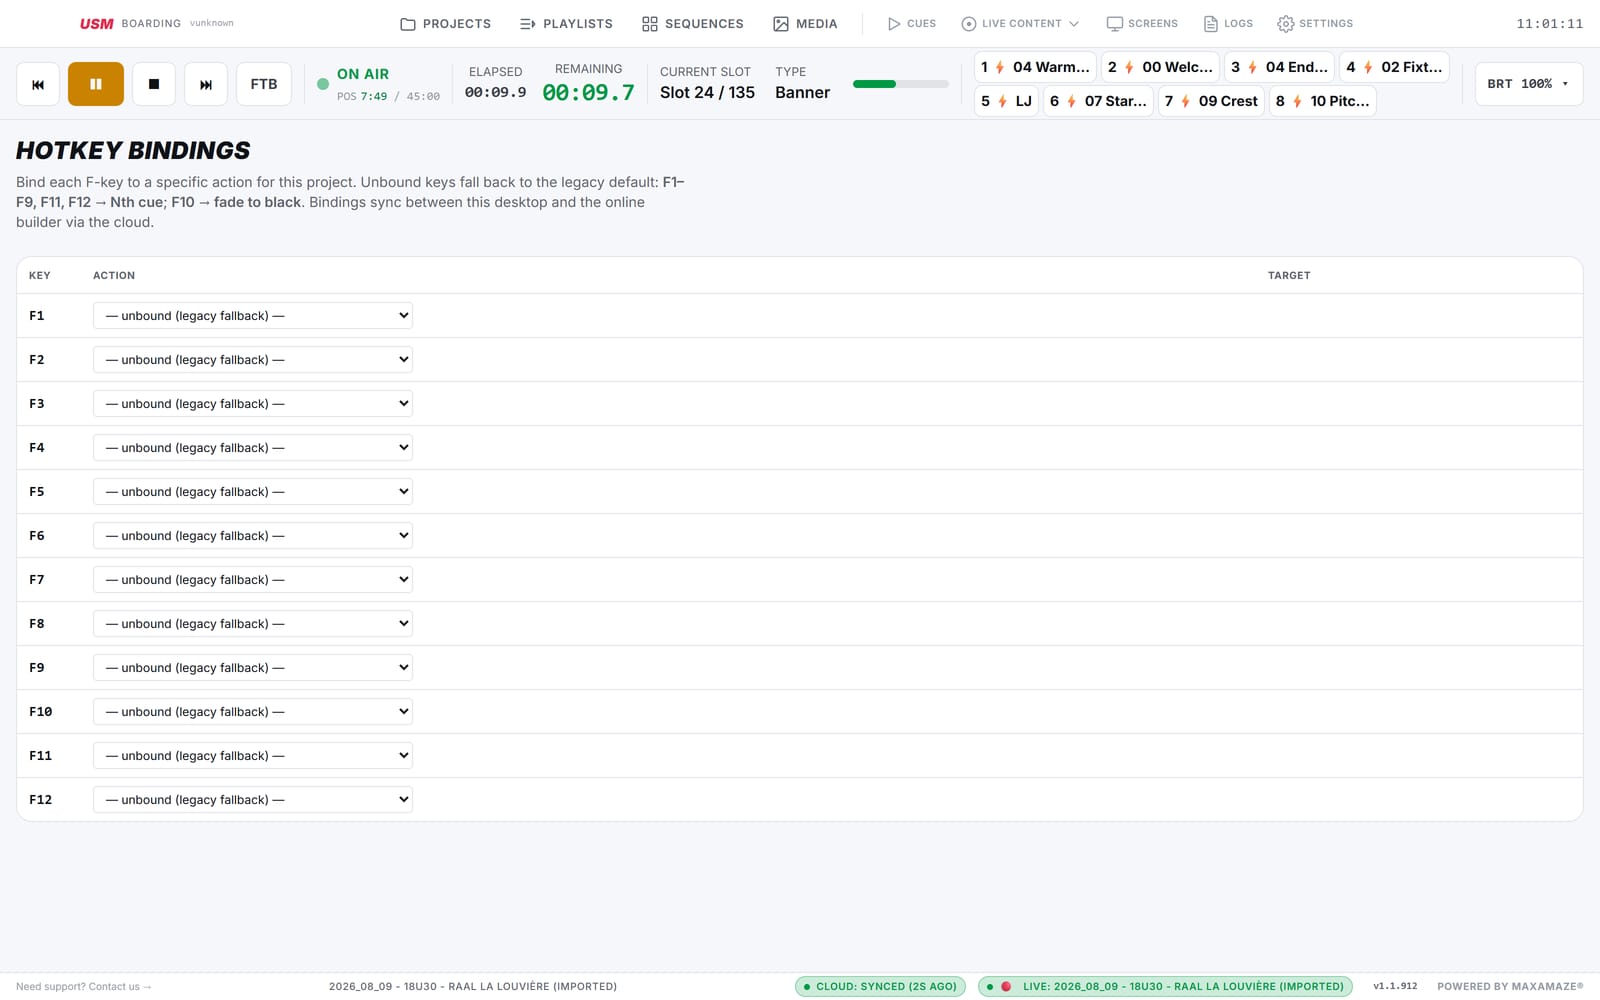
Hotkeys and F-keys
Transport actions can be bound to operator-chosen keys, and F-keys can be bound to cues, allowing a scripted event to be run from the keyboard without a control surface.
Bitfocus Companion module
Bitfocus Companion turns a Stream Deck into a control surface. USM ships its own Companion module, so the buttons, dropdowns and status feedback are built for USM rather than assembled from generic HTTP requests.
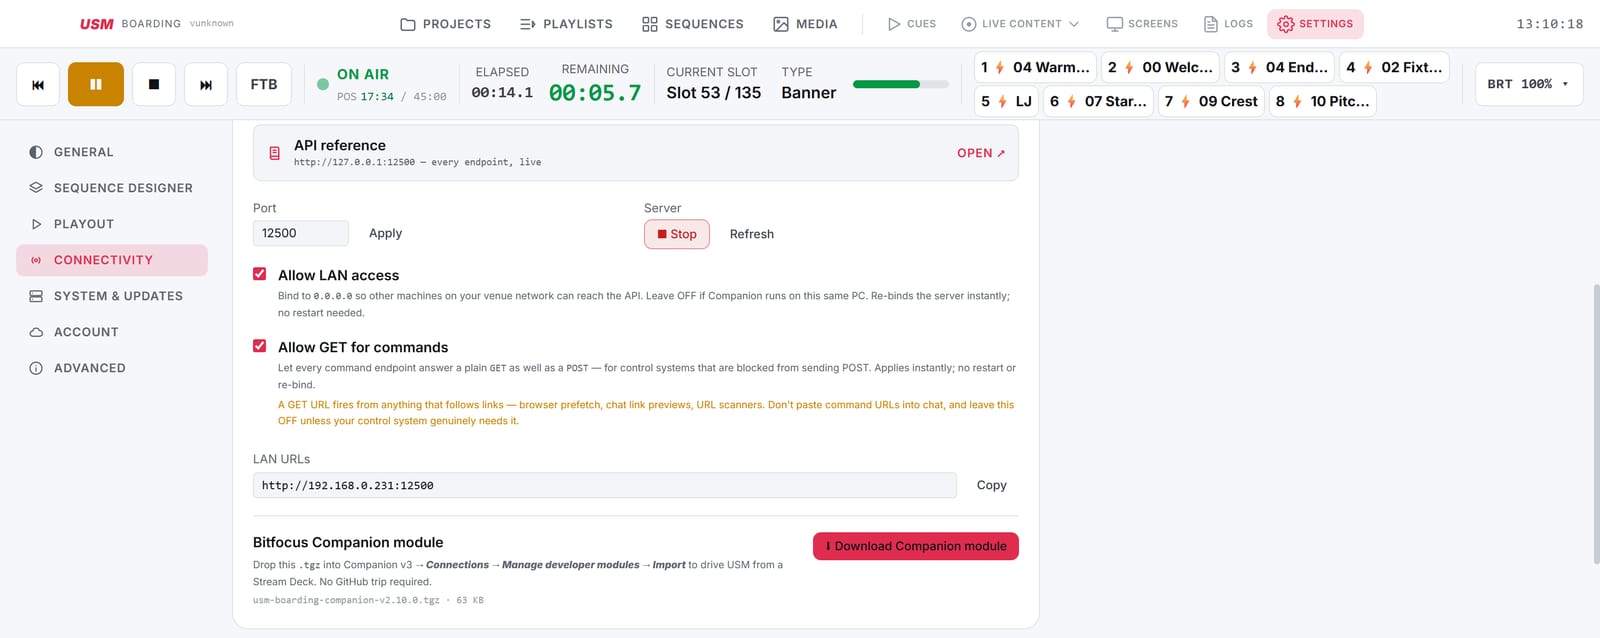
Where to download it
The module is bundled inside the application — there is no download from the internet and no GitHub
account required. Go to Settings → Connectivity → External Control and use
Download Companion module at the foot of the card. USM saves a .tgz package
and shows its version and size next to the button.
Installing it in Companion
- In USM, click Download Companion module and note where the
.tgzis saved. - Open Companion v3 in your browser and go to Connections.
- Choose Manage developer modules.
- Choose Import and select the downloaded
.tgz. - Back in Connections, add a new connection and select the USM Boarding module.
- Enter the address of the USM machine and the API port, then save. The connection turns green when Companion reaches USM.
| Companion runs… | Address to enter | USM setting |
|---|---|---|
| On the same PC as USM | 127.0.0.1, port 12500 | Leave Allow LAN access off — loopback is sufficient. |
| On another machine on the venue network | The LAN URL shown in USM, for example http://192.168.0.231:12500 | Enable Allow LAN access. USM re-binds immediately; no restart is needed. |
Confirming the connection
The same settings card reports connected control surfaces as a count of WebSocket clients, and an API activity panel showing requests served, the time of the last request and which remote address it came from. If a Stream Deck appears dead, these two readouts show whether Companion is reaching USM at all.
What the module provides
Actions and presets for transport, playlists and slots, cues, stingers including group fires, live sources, brightness, Starting XI and Squad reveals, and scoreboard match control. Button feedback is driven over the WebSocket, so a button lights when the thing it controls is live — a stinger toggle shows its current state rather than assuming it. Playlist and preset dropdowns are scoped to the active project.
Allow GET for commands
This option lets every command endpoint answer a plain GET as well as a POST, for control systems that cannot send POST. Leave it off unless required: a GET URL will fire from anything that follows links, including browser prefetch, chat link previews and URL scanners. Do not paste command URLs into chat.
Redundancy
USM can run on two machines as a master and backup pair. The master is operated normally; the backup mirrors its state and can take over the output if the master fails.
Pairing
The two machines discover each other on the LAN by name rather than by IP address.
Project push
The active project is pushed to the backup over the network, with progress shown on both machines.
Mirroring
The backup follows the master's cues, playlist switches and stinger fires by position.
Role swap
The backup takes the editing role and continues the event.
Two-master conflict
If two machines claim the master role over the same backup, USM warns on every machine involved and names the one to fix. Resolve the conflict before going on air.
The warning is scoped to a pair, so more than one USM system can share a venue network without false alarms: an unrelated master elsewhere on the LAN is not a conflict. A backup also takes its orders from one master only — if a second master is pointed at it, those commands are ignored (not applied), both that backup and the master sending them say so, and the partner list marks machines that already belong to another master.
The backup's media library is kept in step automatically, and superseded mirrored media is removed so the backup's disk does not grow with each push. Both machines should run the same USM version; a version mismatch can cause newer settings to be dropped from the sync.
Reports and logs
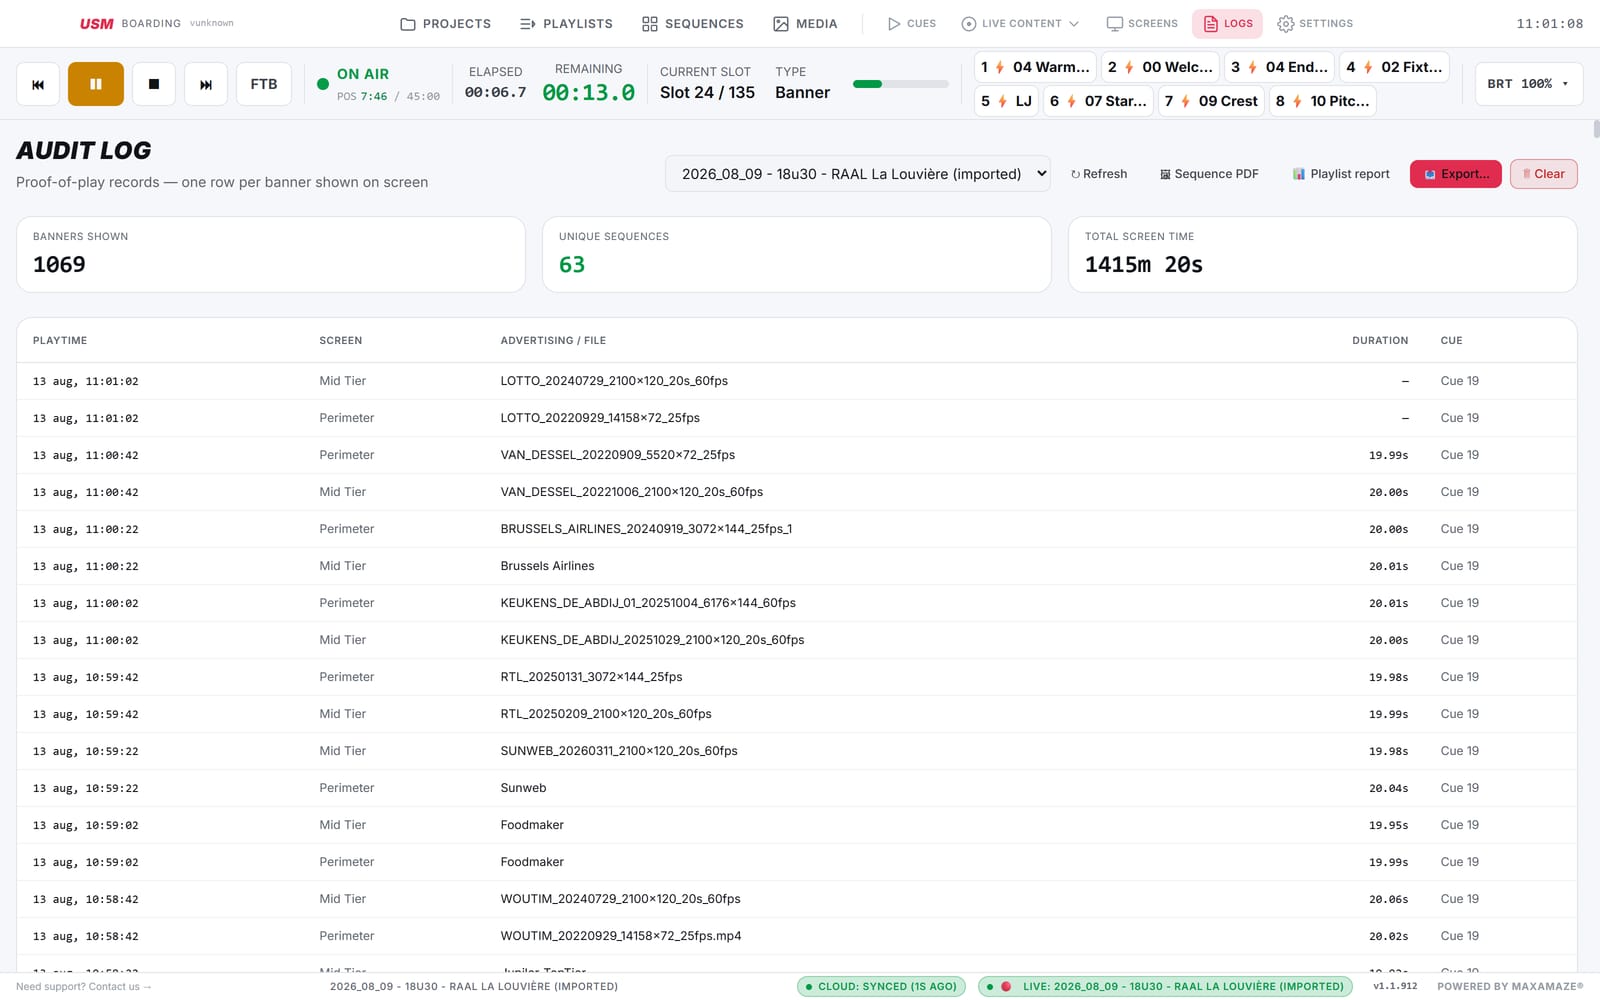
USM records every slot played and can export that record for reporting to sponsors.
| Export | Contents |
|---|---|
| Sponsor analytics | PDF summarising exposure per sponsor over a selected time range. |
| Playlist report | PDF or Excel, with per-screen totals and cumulative play counts. Handles linked multi-screen weighted groups and can produce project-wide totals with one row per sponsor. |
| Audit log | The underlying record — each slot, its duration and its screen — exportable per screen and per time range. |
Technical logging
Separately from proof-of-play, USM keeps rolling per-session technical logs and archives engine boot logs. These are the files required when reporting a fault.
Licensing, updates and cloud
Licensing
Licences are activated online and bound to a machine. The licence sets the permitted screen count and which optional modules are available.
Updates
USM updates itself. A machine can follow the latest build or a version approved by Maxamaze, allowing a fleet to be held on a known release.
Cloud and web editor
Projects mirror to the cloud, where the same editor runs in a browser. Roles are Viewer, Editor and Admin.
Desktop precedence
A project that is live on a playout machine is locked against web editing, and the desktop takes precedence in any conflict.
Keyboard shortcuts
Sequence Designer
| Ctrl+N | Fill all rows with the focused item |
| Ctrl+Shift+N | Fill all rows (pixel mode) |
| Ctrl+C | Copy the focused item |
| Ctrl+V | Paste after the focused item |
| Ctrl+D | Duplicate |
| Ctrl+F | Search media |
| ← → | Step through media or items |
| Delete | Remove the focused item |
| Right-click | Item settings, colour correct, replace media, Edit Links, switch pixel/panel designer |
Playout
| Double-click a sequence | Cut to it directly |
| F-keys | Assignable to cues |
| Transport keys | Configurable under Hotkeys |
Standard practice
- Run Preheat before each event.
- Leave Edit disabled during playout.
- Use FTB rather than Stop to clear the wall temporarily.
- Confirm both screens use the same frame rate before starting.
Troubleshooting
| Symptom | Cause | Action |
|---|---|---|
| Transport controls disabled | CasparCG is not running, or no valid licence | Check the status bar. Start the screens from the Screens page; verify the licence on the Dashboard. |
| A screen does not start | No CasparCG channel assigned, or a channel was added after the engine booted | Stop all screens and start them again; adding a channel requires a fresh boot. |
| Wall shows the test pattern or black | The engine is stopped and the wall is showing its boot default | Start the screens. Playout resumes at its previous position. |
| Live source shows "no source" | The placement is configured but no data is arriving | Confirm the sender appears under NDI discovery and that both machines are on the same subnet. |
| Camera feed appears stretched | The full frame is being mapped to a very wide strip | Use the Crop editor to select a horizontal band of the frame. |
| Two screens drift apart after a cue | Frame rates differ | Set both screens to the same frame rate. |
| Stinger video does not loop | Video playback is set to Follow media and the clip's own mode is freeze | Set the stinger's video playback to Loop. |
| Sponsor receives more exposure than booked | An interrupt stinger is set to restart the slot it interrupted | Set that stinger's When it ends to Resume where interrupted. |
| Cannot add another live source | All 12 layer slots are in use; placements consume slots | Remove an unused placement or source. |
| Playback is uneven on cold clips | Videos have not been warmed | Run Preheat. Consider rebuilding video proxies. |
| Cannot switch project | A playlist is live | Confirm the switch when prompted, or stop the screens first. |
Information required when reporting a fault
The USM version from the status bar, what was on air, and the approximate time. USM keeps rolling per-session logs; the timestamp identifies the relevant session.
Glossary
| Bank | One of two sets of layers USM alternates between, allowing incoming content to be built while the outgoing content is still displayed. |
| Blocked region | A keep-out rectangle in a sequence. Reserves space for an overlay and never plays content itself. |
| CasparCG | The render engine bundled with USM. Runs as a separate process and plays what USM instructs, on the layer specified. |
| Cue | A named action that sets every screen to a defined state in one command. |
| Fold | Dividing the continuous perimeter strip into stacked rows on the video canvas. The LED processor reassembles it around the pitch. |
| Free grid | A screen geometry mode in which panels may have differing widths and positions are addressed in pixels. |
| FTB | Fade to black. Fades the output and holds it, retaining playlist position. |
| Interrupt | A stinger mode that takes over the channel and suspends the underlying slot. |
| Layer slot | One of the 12 live-source positions available per project. Placements consume slots. |
| Media | A still or video file in the project library. |
| NDI | Network Device Interface — video transported between machines over a standard network. |
| Overlay | A stinger mode that renders above the playlist without stopping it. |
| Panels | A screen geometry mode built from identical panels, addressed by panel number. |
| Pixel mode | A per-sequence setting allowing content on a Panels screen to be positioned freely in pixels. |
| Placement | An additional position for an existing live source, shown and hidden with its parent. |
| Playlist | An ordered list of slots; the running order. |
| Preheat | Loading and warming content in advance so it does not reveal cold. |
| Sequence | A complete layout of one screen: which media occupies which panels. |
| Slot | One entry in a playlist: a sequence, a duration and a transition. |
| Stinger | A named sequence fired on demand over or in place of the playlist. |
| Template | A per-screen sequence holding blocked regions and optional media, copied into new sequences. |
| Zone | A named group of panels within a screen carrying its own brightness value. |
| .usm | A project export file containing database rows and media. |
About this manual
This manual describes USM Boarding v1.1.913. Screenshots were taken from a live two-screen installation — one Panels screen and one Free grid screen — running v1.1.912 and v1.1.913 with the system on air.
Scope
Covers operation and technical configuration. The external control interface is summarised; the complete endpoint reference is included in the application. Licensing and fleet administration are summarised.
Currency
USM is updated frequently. Where this manual and the application differ, the application is correct. The in-app Release Notes page lists all changes by version.
Support
Maxamaze BV — thibaut@maxamaze.com. When reporting an issue, include the version shown in the status bar, what was on air, and the approximate time.